blog
Easy way to send emails using Microsoft Graph API (Office 365) with PowerShell
When you're using Office 365 and want to send an email, you have two choices SMTP or Microsoft Graph API, which is a “new” kid on the block. For some time, I've used Microsoft Graph exclusively to send emails in favor of SMTP as it's much easier to manage and generally works over HTTPS. If you type in google “Send email graph API PowerShell,” you will get lots of hits as bloggers, and Microsoft has already covered this topic. Sending with Graph is even more critical than ever because Basic Authentication is deprecated in Office 365. To help out with the transition, Microsoft even released its PowerShell module. With Send-MgUserMail proposed as a way to send emails via Graph API, you will notice it's far from being easy & user-friendly. Over two years ago, I released a PowerShell module called Mailozaurr (some people may not like my modules' naming – but that's how I roll!). In a blog post, Mailozaurr – New mail toolkit (SMTP, IMAP, POP3) with support for oAuth 2.0 and GraphApi for PowerShell, I've shown a basic functionality on how to send emails using SMTP OAuth 2.0 or Graph API, which aims to be drag & drop replacement over Send-MailMessage and is supposed to be as simple as possible to send an email with a low effort and high readability. Today I will focus on sending emails with Graph API alone, as with recent updates, it's even more helpful than before.While Microsoft has disabled basic authentication for POP, IMAP, and SMTP Auth, when it is not used, they are still allowing it to be used for SMTP Auth if you want to. However, as Microsoft says it themselves:
SMTP AUTH will still be available when Basic authentication is permanently disabled on October 1, 2022. The reason SMTP will still be available is that many multi-function devices such as printers and scanners can't be updated to use modern authentication. However, we strongly encourage customers to move away from using Basic authentication with SMTP AUTH when possible. Other options for sending authenticated mail include using alternative protocols, such as the Microsoft Graph API.
This means there's no urgent need to switch to GRAPH API or oAuth 2.0, as many legacy devices can't be easily switched to those. If you have time and means – why not change it now and improve your security?
💡 Microsoft Graph API – The hard way to send emails!
But before we go to see Mailozaurr‘s way of sending emails, I wanted to show you what Microsoft wants you to use. If you know those ways, feel free to skip this section. Here is an example of sending an email with multiple recipients, the body of text, and information that email is not supposed to be saved in the Sent items folder.
Import-Module Microsoft.Graph.Users.Actions
$params = @{
  Message = @{
    Subject = "Meet for lunch?"
    Body = @{
      ContentType = "Text"
      Content = "The new cafeteria is open."
    }
    ToRecipients = @(
      @{
        EmailAddress = @{
          Address = "fannyd@contoso.onmicrosoft.com"
        }
      }
    )
    CcRecipients = @(
      @{
        EmailAddress = @{
          Address = "danas@contoso.onmicrosoft.com"
        }
      }
    )
  }
  SaveToSentItems = "false"
}
# A UPN can also be used as -UserId.
Send-MgUserMail -UserId $userId -BodyParameter $params
If you look above, after a while, you could understand how to send the basic email messages, but if you're just starting in PowerShell, this all seems to be very complicated when you want to achieve a quick and easy email functionality in your scripts. Another example shown by Microsoft is how to send emails with attachments using Microsoft Graph. However, if you look at the code below it's for the reader to find out what exactly codes ContentBytes means, where it comes from, and how attachment.txt from a folder on your drive somehow becomes ContentBytes. Noone mentions this anywhere. It's just left there for you to figure it out.
Import-Module Microsoft.Graph.Users.Actions
$params = @{
  Message = @{
    Subject = "Meet for lunch?"
    Body = @{
      ContentType = "Text"
      Content = "The new cafeteria is open."
    }
    ToRecipients = @(
      @{
        EmailAddress = @{
          Address = "meganb@contoso.onmicrosoft.com"
        }
      }
    )
    Attachments = @(
      @{
        "@odata.type" = "#microsoft.graph.fileAttachment"
        Name = "attachment.txt"
        ContentType = "text/plain"
        ContentBytes = "SGVsbG8gV29ybGQh"
      }
    )
  }
}
# A UPN can also be used as -UserId.
Send-MgUserMail -UserId $userId -BodyParameter $params
Before Microsoft released its PowerShell module, people had to resort to using Graph API via Invoke-RestMethod, where you have to build the message yourself. You had to find out the structure of the message, and what the options are, and then build a body out of it. The worst part is – one little mistake, and all you get is a Bad Request error message, and you're on your own.
$AccessToken = "**Access Token with Mail.Send permission***"
$ApiUrl = "https://graph.microsoft.com/v1.0/me/sendMail"
# Create JSON Body object
$Body =
@"
{
"message" : {
"subject": "Test message",
"body" : {
"contentType": "Text",
"content": "This is test mail"
},
"toRecipients": [{"emailAddress" : { "address" : "to_address@domain.com" }}]
}
}
"@
Invoke-RestMethod -Headers @{Authorization = "Bearer $AccessToken"} -Uri $ApiUrl -Method Post -Body $Body -ContentType "application/json"
Microsoft Graph is a great product, but its packaging is far from great. If I compare the standard SMTP email process using Send-MailMessage to the proposed Graph API approach, it's no wonder people will choose an old technology over the new one! Even after working for a longer time with Graph API, I have to take a few deep breaths before trying to tackle available documentation. Let's look at two old examples for Send-MailMessage as shown on Microsoft Docs.
# send email message
Send-MailMessage -From 'User01 ' -To 'User02 ' -Subject 'Test mail' -SmtpServer 'smtp.fabrikam.com'
# send email message with attachment and some body with priority of High and delivery notification
Send-MailMessage -From 'User01 ' -To 'User02 ', 'User03 ' -Subject 'Sending the Attachment' -Body "Forgot to send the attachment. Sending now." -Attachments .\data.csv -Priority High -DeliveryNotificationOption OnSuccess, OnFailure -SmtpServer 'smtp.fabrikam.com'
The difference between the Graph API cmdlet and the standard SMTP cmdlet is enormous. Send-MailMessage is readable, simplified, and quick to adopt. Why not Graph API?
💡 Microsoft Graph API – Authentication
By showing you how bad things can be and linking to other blog posts above, you will hopefully appreciate what Mailozaurr does for you when sending emails. One important thing to know when dealing with Graph API in Application mode is that before you can use it, you need to create an Application in Azure that allows you to Send Emails. Once created, granted permissions, and generated secrets, you should have ApplicationID, ClientID, and ClientSecret. Alternatively, ClientSecret can be replaced with Certificate, making the process more secure. Once you have that information, it's time to create the **Credentials **we will use in Send-EmailMessage. There are three ways to do it (that I will share – probably a few more exists):
- Method 1 – Create credentials directly with ClientID, ClientSecret and DirectoryID. While easy and useful, it's not secure if you want to save it to use daily, as anyone having access to the script will have the ClientSecret, which is not very secure
$Credential = ConvertTo-GraphCredential -ClientID '0fb383f1-8bfe-4' -ClientSecret 'VKDM_2.' -DirectoryID 'ceb371f6-8'
- Method 2 – Create credentials using ClientID, DirectoryID and with encrypted ClientSecret. You can use the following command to encrypt credentials using built-in DPAPI encryption, and the encrypted secret will be copied to your clipboard.
ConvertTo-SecureString -String 'VKDM_2.eC2U' -AsPlainText -Force | ConvertFrom-SecureString | Set-Clipboard
Once you have an encrypted string, you can use it as part of the ClientSecretEncrypted parameter, which will make sure that the secret stays secret and will only be available for you or your account to use.
$Credential = ConvertTo-GraphCredential -ClientID '0fb383f1-8bfe-4c' -ClientSecretEncrypted 'This is encrypted string' -DirectoryID 'ceb376'
Remember that DPAPI encryption works by taking your username and computer name into the encryption process. The encrypted string won't be usable if you move the script to a different machine or if you will run it under a different account. Even if someone copies your script, the encrypted string will stay secure.
- Method 3 – Use ClientID, CertificateThumbprint (an existing certificate in your certificate store is required), and DirectoryID.
Import-Module MSAL.PS -Force

$MsalTokenSplat = [ordered] @{
    ClientId              = ''
    CertificateThumbPrint = ''
    TenantId              = ''
    TenantDomain          = ''
}
$MsalToken = Get-MsalToken @MsalTokenSplat
$Credential = ConvertTo-GraphCredential -MsalToken $MsalToken.AccessToken
This is the most secure method of using an additional Microsoft module to utilize a certificate as part of the authentication process. As with two other ways, ConvertTo-GraphCredential takes care of all translations to make them easy to use. Depending on your use case, different methods are available when dealing with the MSAL.PS module to authenticate. The important part is to provide an output of the MSAL token to the Convert function, which will do the rest for you.
Now we have the **Credential **variable created and ready, we're good to go and use Send-EmailMessage, which I mentioned earlier.
💡 Microsoft Graph API – An easy way to send emails
When I wrote Mailozaurr, my main goal was to have a drag & drop replacement for Send-MailMessage because, as Microsoft mentions it, it's not recommended anymore.
The Send-MailMessage cmdlet is obsolete. This cmdlet does not guarantee secure connections to SMTP servers. While there is no immediate replacement available in PowerShell, we recommend you do not use Send-MailMessage. For more information, see Platform Compatibility note DE0005.
Of course, you should not read it, as it is suddenly wrong and something you need to stop using. If you still use the SMTP protocol to send emails and don't use oAuth 2.0 or Graph API, you can continue using Send-Mailmessage as it is.
But if you want choices, Mailozaurr, with its Send-EmailMessage, can make it very easy to transition. While writing that function, I've decided to support an easy switch from SMTP to SMTP with oAuth 2.0 to Microsoft Graph to SendGrid API (which is also supported). This gives me one tool to manage sending emails with minimal effort depending on the situation of my projects.
# Sending emails with Graph
Send-EmailMessage -From 'przemyslaw.klys@test.pl' -To 'kontakt@test.pl' -Credential $Credential -HTML $Body -Subject 'This is another test email' -Graph -Verbose -Priority Low -DoNotSaveToSentItems
Using the command above and the Graph switch, we notify Send-EmailMessage that this is a Graph-based email, and Mailozaurr will do proper message building itself. Are we sending attachments? As easy as using the Attachment parameter, which accepts an array of paths to files.
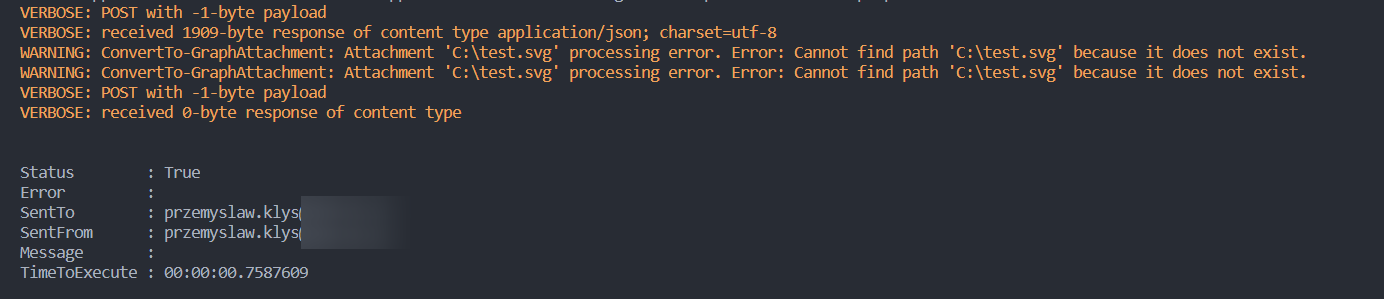
Send-EmailMessage -From 'my.account@test.pl' -To 'different.account@test.pl' -Credential $Credential -HTML $Body -Subject 'This is another test email 2' -Graph -Verbose -Priority Low -Attachment @("C:\test.svg","C:\otherfile.txt")
One thing to be aware of with attachments is that a standard message sent using Graph API can only have attachments up to 4MB in size. If you want to attach more significant attachments up to supported 150MB, you would need to create a draft message, create an upload session, upload attachments using another endpoint and finally send an email message. It's a fun exercise if you like that kind of fun. How do you deal with it in Send-EmailMessage? You don't. It does it for you. Once you provide a file larger than a threshold, it will create all that process for you and send an email without you having to do anything about it or noticing any difference. It also supports CC, BCC, and ReplyTo options. Delivery receipts and read receipts are also supported!
Send-EmailMessage -From 'przemyslaw.klys@test.pl' -To 'przemyslaw.klys@test.pl' -Credential $Credential -HTML $Body -Subject 'This is another test email' -Graph -Verbose -Priority Low -Attachment "C:\test.svg" -ReplyTo "kontakt@test.pl" -RequestReadReceipt -RequestDeliveryReceipt
And if you prefer splatting over very long lines, here's another approach to sending emails easily using Graph.
$sendEmailMessageSplat = @{
    From                   = 'przemyslaw.klys@test.pl'
    To                     = 'przemyslaw.klys@test.pl'
    Credential             = $Credential
    HTML                   = $Body
    Subject                = 'This is another test email'
    Graph                  = $true
    Verbose                = $true
    Priority               = 'Low'
    Attachment             = "C:\test.svg"
    ReplyTo                = "kontakt@test.pl"
    RequestReadReceipt     = $true
    RequestDeliveryReceipt = $true
}

Send-EmailMessage @sendEmailMessageSplat
Another cool feature of Send-EmailMessage is that, by default, it returns the status of a sent email message and the reason for failure if there was one. If you don't need this PowerShell object, you can use Suppress parameter to prevent this information from being exposed.
As you can see, with the help of Mailozaurr, sending emails with Graph API isn't any different than sending via standard SMTP. This should make it much easier to adopt secure sending of emails without the need to go thru a complicated process.
💡 Firewall / Network Requirements
Sending email with Microsoft GRAPH no longer uses ports 25 or 587 and requires different network firewall ports. Graph API usesthe following URLs:
Of course, HTTPS port 443 over TCP needs to be open.
💡 Sending emails with HTML content
Hopefully, you can now use Graph API to send emails easily using Mailozaurr, but one thing that often is more difficult than sending the email itself is creating HTML content. In the old days, you would need to play with HTML and CSS and hope it worked. Or you could install the PSWriteHTML PowerShell module and let the hard work be done for you. PSWriteHTML takes approach of never using HTML/CSS again to create HTML pages, but also emails. If you combine Mailozaurr and PSWriteHTML, you will see those two greatly simplify the process of sending nicely formatted emails. Would you believe the following email was created in 27 lines of PowerShell code?
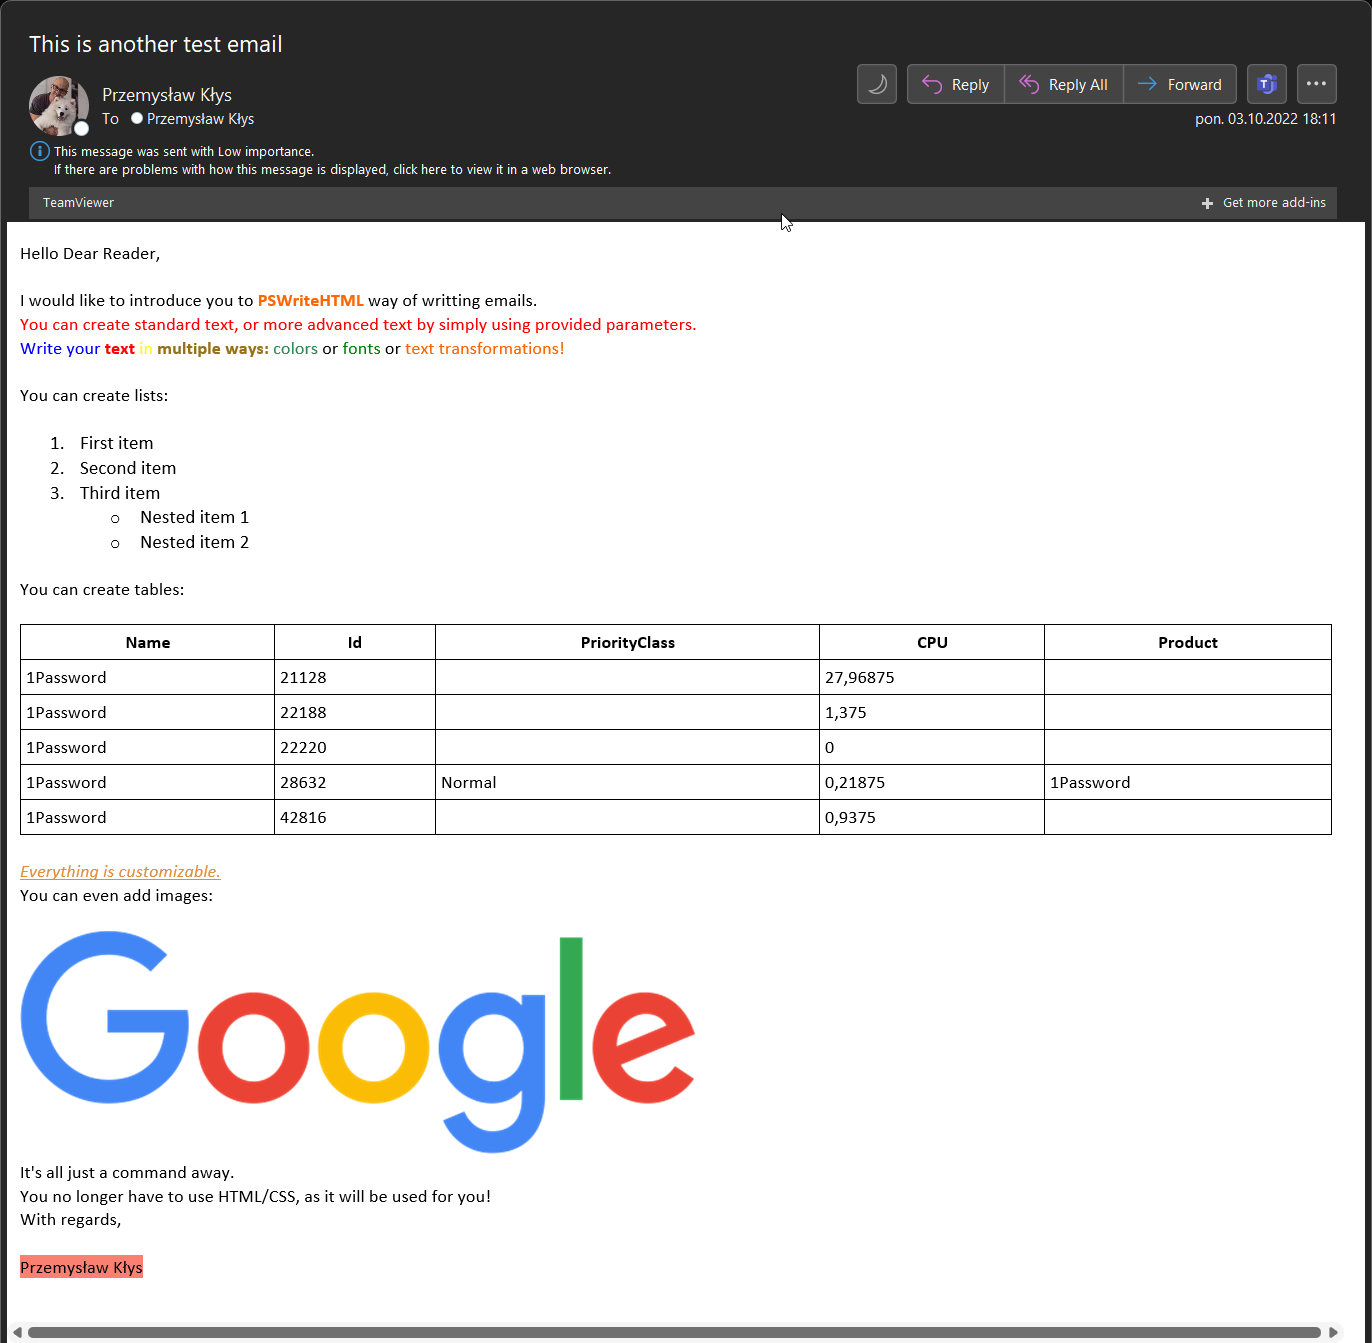
It contains standard, advanced, lists, tables, and images, and all that is done with ZERO HTML/CSS.
$Body = EmailBody {
    EmailText -Text "Hello Dear Reader," -LineBreak
    EmailText -Text "I would like to introduce you to ", "PSWriteHTML", " way of writting emails. " -Color None, SafetyOrange, None -FontWeight normal, bold, normal
    EmailText -Text "You can create standard text, or more advanced text by simply using provided parameters. " -Color Red
    EmailText -Text @(
        "Write your ", "text", " in ", "multiple ways: ", " colors", " or ", "fonts", " or ", "text transformations!"
    ) -Color Blue, Red, Yellow, GoldenBrown, SeaGreen, None, Green, None, SafetyOrange -FontWeight normal, bold, normal, bold, normal, normal, normal, normal, normal -LineBreak
    EmailText -Text "You can create lists: "
    EmailList {
        EmailListItem -Text "First item"
        EmailListItem -Text "Second item"
        EmailListItem -Text "Third item"
        EmailList {
            EmailListItem -Text "Nested item 1"
            EmailListItem -Text "Nested item 2"
        }
    } -Type Ordered -FontSize 15
    EmailText -Text "You can create tables: " -LineBreak
    EmailTable -DataTable (Get-Process | Select-Object -First 5 -Property Name, Id, PriorityClass, CPU, Product) -HideFooter
    EmailText -LineBreak
    EmailText -Text "Everything is customizable. " -Color California -FontStyle italic -TextDecoration underline
    EmailText -Text "You can even add images: " -LineBreak
    EmailImage -Source "https://www.google.com/images/branding/googlelogo/2x/googlelogo_color_272x92dp.png" #-Width 200 -Height 200
    EmailText -Text "It's all just a command away. " -Color None -FontStyle normal -TextDecoration none
    EmailText -Text "You no longer have to use HTML/CSS, as it will be used for you!"
    EmailText -Text "With regards," -LineBreak
    EmailText -Text "Przemysław Kłys" -TextTransform capitalize -BackGroundColor Salmon
}

$Credential = ConvertTo-GraphCredential -ClientID $ClientID -ClientSecretEncrypted $EncryptedClientSecret -DirectoryID $DirectoryID

# sending email
$sendEmailMessageSplat = @{
    From                   = 'przemyslaw.klys@test.pl'
    To                     = 'przemyslaw.klys@test.pl'
    Credential             = $Credential
    HTML                   = $Body
    Subject                = 'This is another test email'
    Graph                  = $true
    Verbose                = $false
    Priority               = 'Low'
    Attachment             = "C:\test.svg"
    ReplyTo                = "kontakt@test.pl"
    RequestReadReceipt     = $false
    RequestDeliveryReceipt = $false
}

Send-EmailMessage @sendEmailMessageSplat
Using EmailBody, EmailText, EmailList, EmailListItem, EmailTable, and EmailImage functions, we could quickly build an email that is readable, nice looking, easy to modify, can contain variables as needed, and fully works with Microsoft Graph API and Send-EmailMessage. PSWriteHTML provides a few other experimental email features. Those are EmailLayout, EmailLayoutRow, and EmailLayoutColumn. Using those functions, you can display content next to each other quickly creating really advanced view for your emails. Take a look at example below

$Body = EmailBody {
    EmailText -Text "Hello Dear Reader," -LineBreak
    EmailText -Text "I would like to introduce you to ", "PSWriteHTML", " way of writting emails. " -Color None, SafetyOrange, None -FontWeight normal, bold, normal
    EmailText -Text "You can create standard text, or more advanced text by simply using provided parameters. " -Color Red
    EmailText -Text @(
        "Write your ", "text", " in ", "multiple ways: ", " colors", " or ", "fonts", " or ", "text transformations!"
    ) -Color Blue, Red, Yellow, GoldenBrown, SeaGreen, None, Green, None, SafetyOrange -FontWeight normal, bold, normal, bold, normal, normal, normal, normal, normal -LineBreak

    EmailText -Text "You can create lists, but also a multi-column layout with them: " -LineBreak

    EmailLayout {
        EmailLayoutRow {
            EmailLayoutColumn {
                EmailList {
                    EmailListItem -Text "First item"
                    EmailListItem -Text "Second item"
                    EmailListItem -Text "Third item"
                    EmailList {
                        EmailListItem -Text "Nested item 1"
                        EmailListItem -Text "Nested item 2"
                    }
                } -Type Ordered -FontSize 15
            }
            EmailLayoutColumn {
                EmailList {
                    EmailListItem -Text "First item - but on the right"
                    EmailListItem -Text "Second item - but on the right"
                    EmailListItem -Text "Third item"
                    EmailList {
                        EmailListItem -Text "Nested item 1"
                        EmailListItem -Text "Nested item 2"
                    }
                } -Type Ordered -FontSize 10 -Color RedBerry
            }
        }
        EmailLayoutRow {
            EmailText -Text "Lets see how you can have multiple logos next to each other" -LineBreak
        }
        EmailLayoutRow {
            EmailLayoutColumn {
                EmailImage -Source "https://www.google.com/images/branding/googlelogo/2x/googlelogo_color_272x92dp.png" -Width 150
            } -PaddingTop 30
            EmailLayoutColumn {
                EmailImage -Source "/wp-content/uploads/2015/05/Logo-evotec-012.png" -Width 150
            } -PaddingTop 30
            EmailLayoutColumn {
                EmailImage -Source "https://upload.wikimedia.org/wikipedia/commons/9/96/Microsoft_logo_%282012%29.svg" -Width 150
            } -PaddingTop 30
            EmailLayoutColumn {
                EmailImage -Source "https://upload.wikimedia.org/wikipedia/commons/thumb/f/fe/Pepsi_logo_%282014%29.svg/2560px-Pepsi_logo_%282014%29.svg.png" -Width 150
            } -PaddingTop 30
        }
        EmailLayoutRow {
            EmailText -LineBreak
            EmailText -LineBreak
        }
        EmailLayoutRow {
            EmailText -Text "You can create tables: " -LineBreak
            EmailTable -DataTable (Get-Process | Select-Object -First 5 -Property Name, Id, PriorityClass, CPU, Product) -HideFooter
            EmailText -LineBreak
            EmailText -Text "Everything is customizable. " -Color California -FontStyle italic -TextDecoration underline
            EmailText -Text "You can even add images: " -LineBreak
            EmailImage -Source "https://www.google.com/images/branding/googlelogo/2x/googlelogo_color_272x92dp.png" #-Width 200 -Height 200
            EmailText -Text "It's all just a command away. " -Color None -FontStyle normal -TextDecoration none
            EmailText -Text "You no longer have to use HTML/CSS, as it will be used for you!"
            EmailText -Text "With regards," -LineBreak
            EmailText -Text "Przemysław Kłys" -TextTransform capitalize -BackGroundColor Salmon
        }
    }
}

Save-HTML -FilePath "test.html" -ShowHTML -HTML $Body
Notice how using EmailLayoutRow/EmailLayoutColumn, I put two lists and four images next to each other. It's still in the experimental stage but feel free to play and report feedback on Github. Using the Save-HTML function helps test HTML in a browser rather than sending emails all the time, but be careful that what you see in the browser often may look different in email clients. Always test before production rollout!
💡 Installing Mailozaurr PowerShell Module
Finally, we've arrived at the stage where you ask the question – how can I get Mailozaurr or/and PSWriteHTML? How do you install it? The easiest and most optimal way is to use PowerShellGallery. This will get you up and running in no time. You're done and when there is an update, just run **Update-Module **and it will do the rest!
Install-Module Mailozaurr -Force -Verbose
Install-Module PSWriteHTML -Force -Verbose
However, if you're into code – want to see how everything is done, you can use GitHub sources. Please remember that the PowerShellGallery version is optimized and better for production use. If you see any issues, bugs, or features that are missing, please make sure to submit them on GitHub.
- Code for Mailozaurr is published as a module on PowerShellGallery
- Issues for Mailozaurr should be reported on GitHub
- Code for Mailozaurr is published on GitHub
- Code for PSWriteHTML is published as a module on PowerShellGallery
- Issues for PSWriteHTML should be reported on GitHub
- Code for **PSWriteHTML **is published on GitHub
If you would like to learn more about PSWriteHTML, feel free to browse thru other blog posts about it, as the email functionality is just a very minor part of that module.
- Meet Statusimo – PowerShell generated Status Page
- Meet Dashimo – PowerShell Generated Dashboard
- Dashimo – Easy Table Conditional Formatting and more
- Out-HtmlView – HTML alternative to Out-GridView
- Meet Emailimo – New way to send pretty emails with PowerShell
- All your HTML Tables are belong to us
- Sending HTML emails with PowerShell and zero HTML knowledge required
- Dashimo (PSWriteHTML) – Charting, Icons, and few other changes
- Working with HTML in PowerShell just got better
- Comparing two or more objects visually in PowerShell (cross-platform)
- Easy way to create diagrams using PowerShell and PSWriteHTML
- Nested Tabs, Diagram Updates, Diagram Events, Calendar Object, and more in PSWriteHTML
- Emailimo merged into PSWriteHTML, IE support, and no dependencies
- Active Directory DHCP Report to HTML or EMAIL with zero HTML knowledge
- Creating Office 365 Migration Diagram with PowerShell
- Advanced HTML reporting using PowerShell