blog
How to contribute a post to evotec.xyz
Evotec is opening evotec.xyz to more practical voices from the community: people who build, automate, migrate, troubleshoot, document, and learn in the real world.
You do not need to write a perfect article before you start. A useful script, a hard-won lesson, an odd edge case, a migration note, or a clear troubleshooting story can all become something valuable for other engineers.
This guide explains how to prepare that article so it can be reviewed, improved, credited properly, and published on evotec.xyz.
Open the contribution repository
The goal is simple:
- make contributing approachable
- keep review predictable
- keep publishing safe and consistent
- give proper credit to contributors
- help more people share practical engineering knowledge
Quick Version
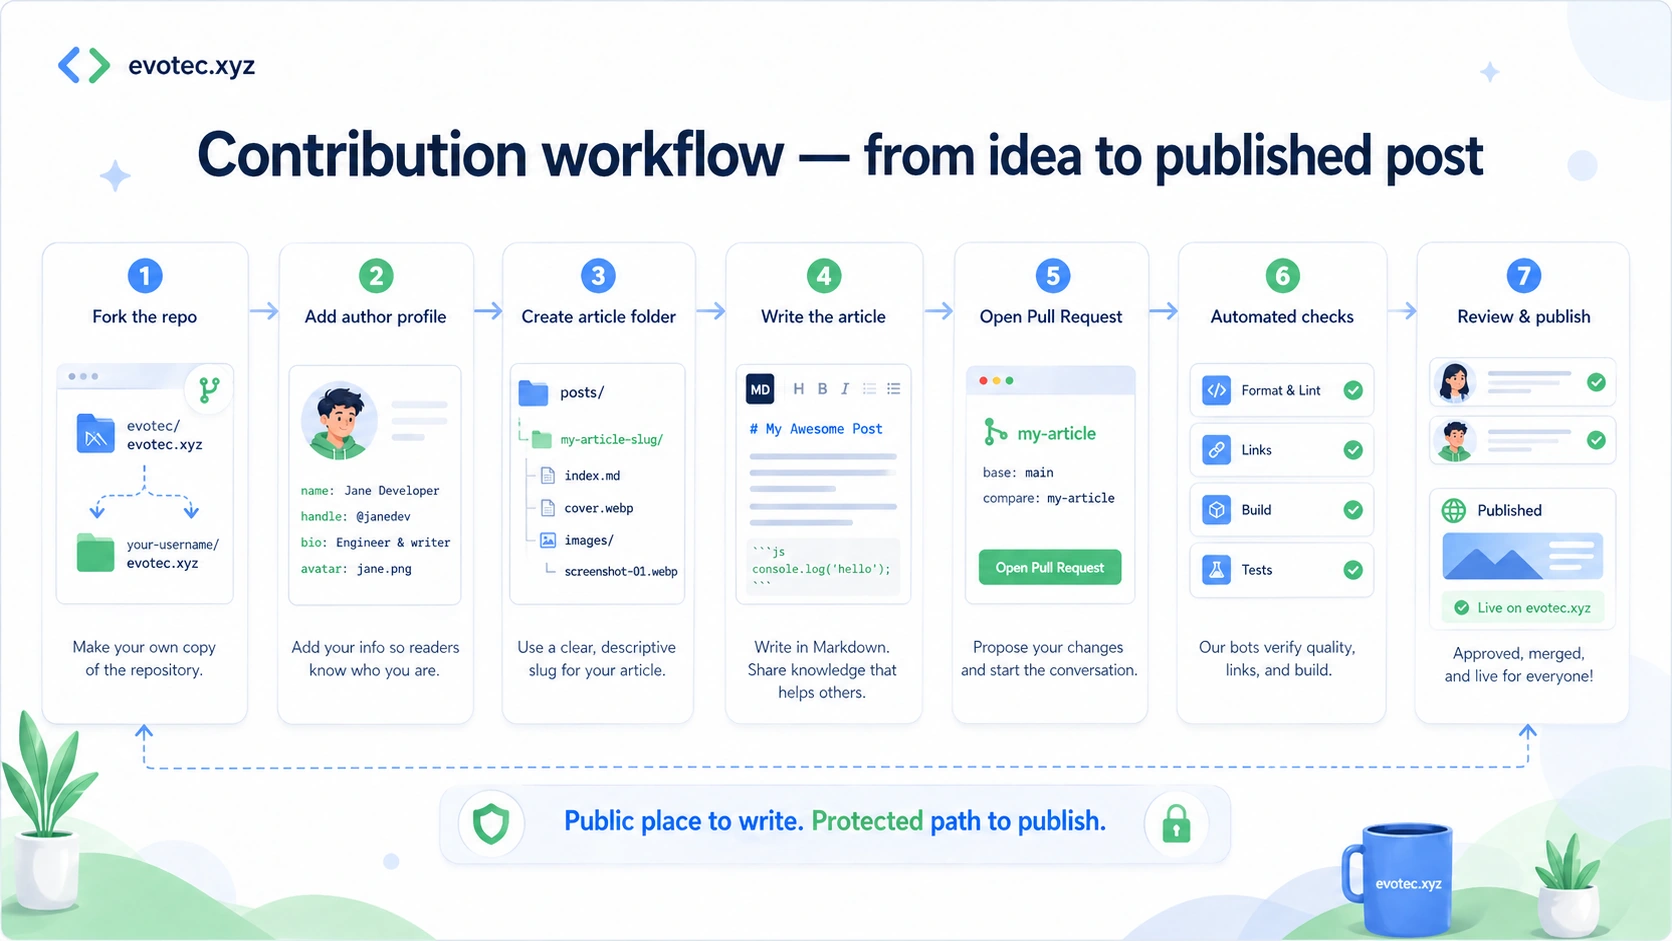
If you already know GitHub and Markdown, this is the short version:
- Fork the
Website.Contributionsrepository. - Create your author profile in
authors/<your-slug>.yml. - Create your article folder in
posts/<language>/<article-slug>/. - Add
index.md, a cover image, and animages/folder for screenshots and article images. - Write the article in Markdown.
- Use local image paths only.
- Commit your changes.
- Open a pull request.
- Fix validation issues if GitHub Actions reports any.
- Wait for review.
If you are new to GitHub, Markdown, or pull requests, the rest of this guide walks through the process step by step.
Who This Guide Is For
This guide is for:
- first-time contributors
- people who have never opened a pull request
- people who are not sure how the article folder should look
- people who do not know where images go
- people who want a safe, repeatable process
You do not need to be an expert writer. A focused, practical article is usually more useful than a long, abstract one.
Good topics include:
- PowerShell scripts that solved a real problem
- Microsoft 365, Entra ID, Exchange, Active Directory, Intune, Azure, or security lessons
- migration notes
- troubleshooting stories
- unusual edge cases
- monitoring ideas
- dashboards and reports
- automation patterns
- open-source usage
- lessons learned from production work
Step 1: Open the Repository
Start with the contribution repository:
https://github.com/EvotecIT/Website.Contributions
You will need a GitHub account.
Once you are on the repository page, you have two common ways to work.
Option A — easiest for beginners
Use the GitHub web interface in the browser.
This is the easiest option if:
- you do not want to install Git
- you do not want to use command line tools
- you want to keep everything simple
Option B — local editing
Clone the repository to your computer and edit locally using tools like:
- Visual Studio Code
- Git
- PowerShell
- your normal editor
If you are not sure which path to choose, use Option A first.
Step 2: Fork the Repository
Click Fork on GitHub.
A fork creates your own copy of the repository under your GitHub account, so you can edit it safely.
In simple terms:
- the original repository stays unchanged
- you work in your own copy
- when you are ready, you open a pull request back to the original repository
This keeps the contribution process safe and predictable.
Step 3: Choose the Article Language
Articles live under:
posts/<language>/<article-slug>/
The first folder after posts/ is the language.
Examples:
posts/en/my-article-slug/
posts/pl/moj-artykul/
Use:
enfor Englishplfor Polish
Other website interface languages may exist, but blog contribution intake should stay in en or pl unless maintainers extend the workflow. If you are unsure, use English.
Examples:
posts/en/how-to-check-dns-records/
posts/pl/jak-sprawdzic-rekordy-dns/
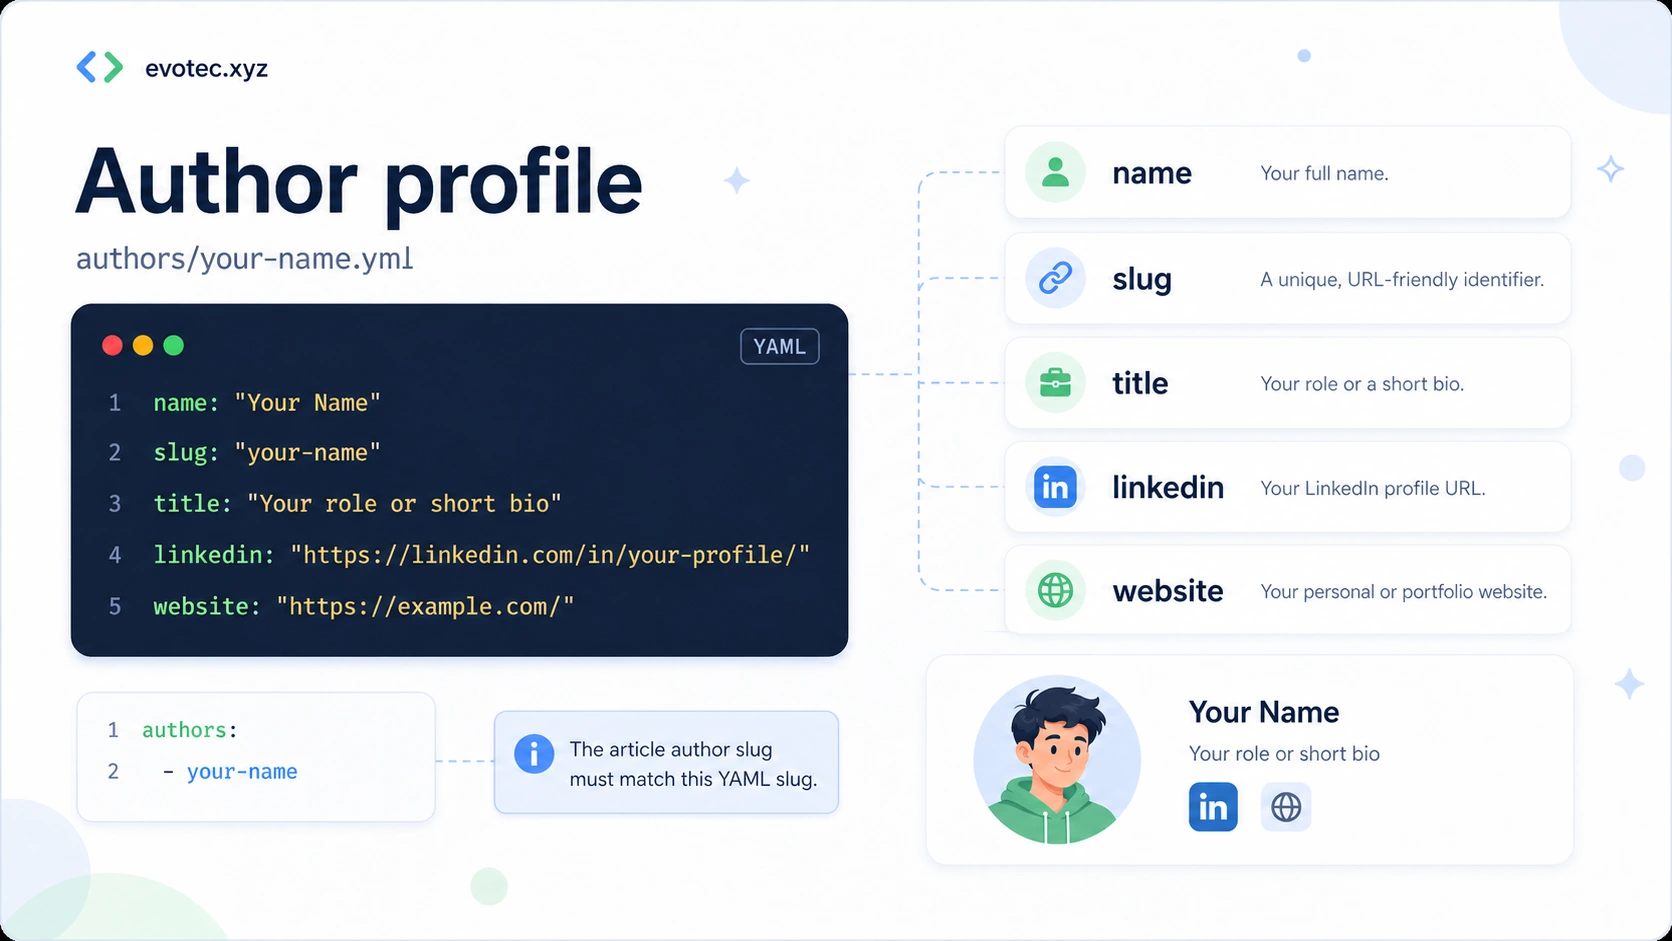
Step 4: Create Your Author Profile
Every contributor should have an author profile.
Create a file in the authors folder:
authors/your-name.yml
Example:
name: "Your Name"
slug: "your-name"
title: "Your role or short bio"
avatar: "./images/your-name.webp"
x: "https://x.com/your-handle"
linkedin: "https://www.linkedin.com/in/your-profile/"
github: "https://github.com/your-handle"
website: "https://example.com/"
You do not need every field. If you do not use X, LinkedIn, GitHub, a personal website, or an avatar, leave out that field.
If you want to show a profile photo, place a square image under authors/images/ and reference it from the author profile with avatar: "./images/your-name.webp". Local avatars are optional and are imported into the website together with the author catalog.
A smaller valid example can look like this:
name: "Your Name"
slug: "your-name"
title: "PowerShell enthusiast and Microsoft engineer"
website: "https://example.com/"
The most important rule is that the slug from the author file must match the author value used in the article front matter.
Example:
authors:
  - your-name
If those values do not match, validation may fail or the article may not link to the author correctly.
Step 5: Create the Article Folder
Each article should live in its own folder.
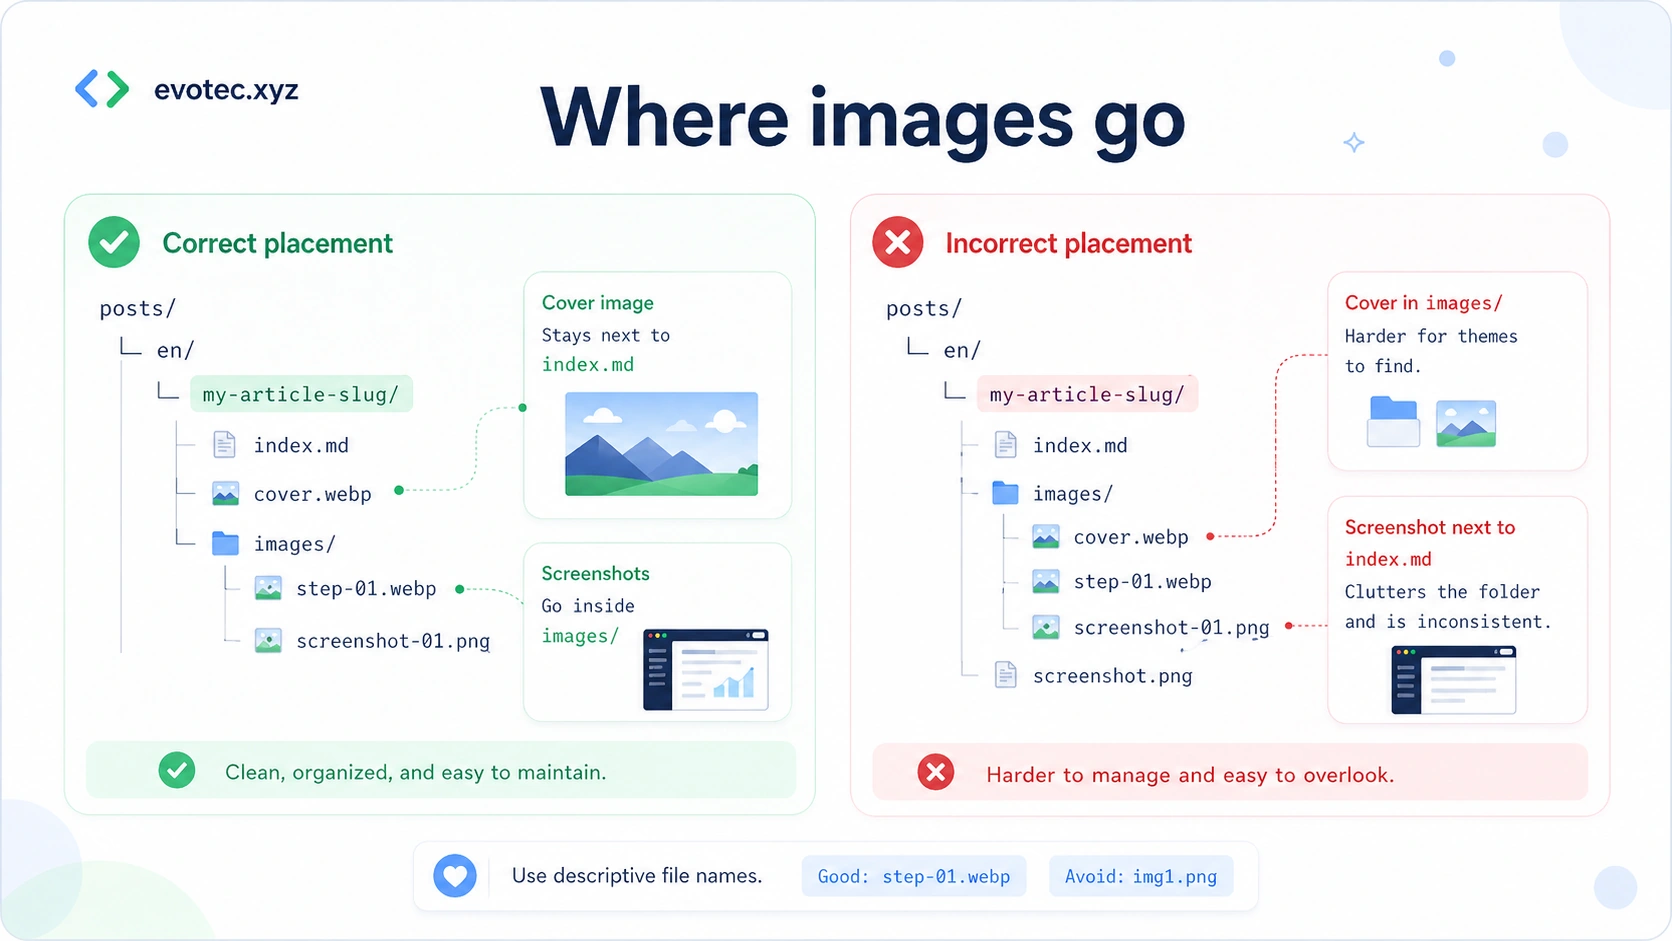
Use this shape:
posts/en/my-article-slug/
  index.md
  cover.webp
  images/
    screenshot-01.webp
The structure means:
posts/— all postsen/— the article languagemy-article-slug/— the unique article folderindex.md— the article itselfcover.webp— the cover imageimages/— screenshots and other article-specific images
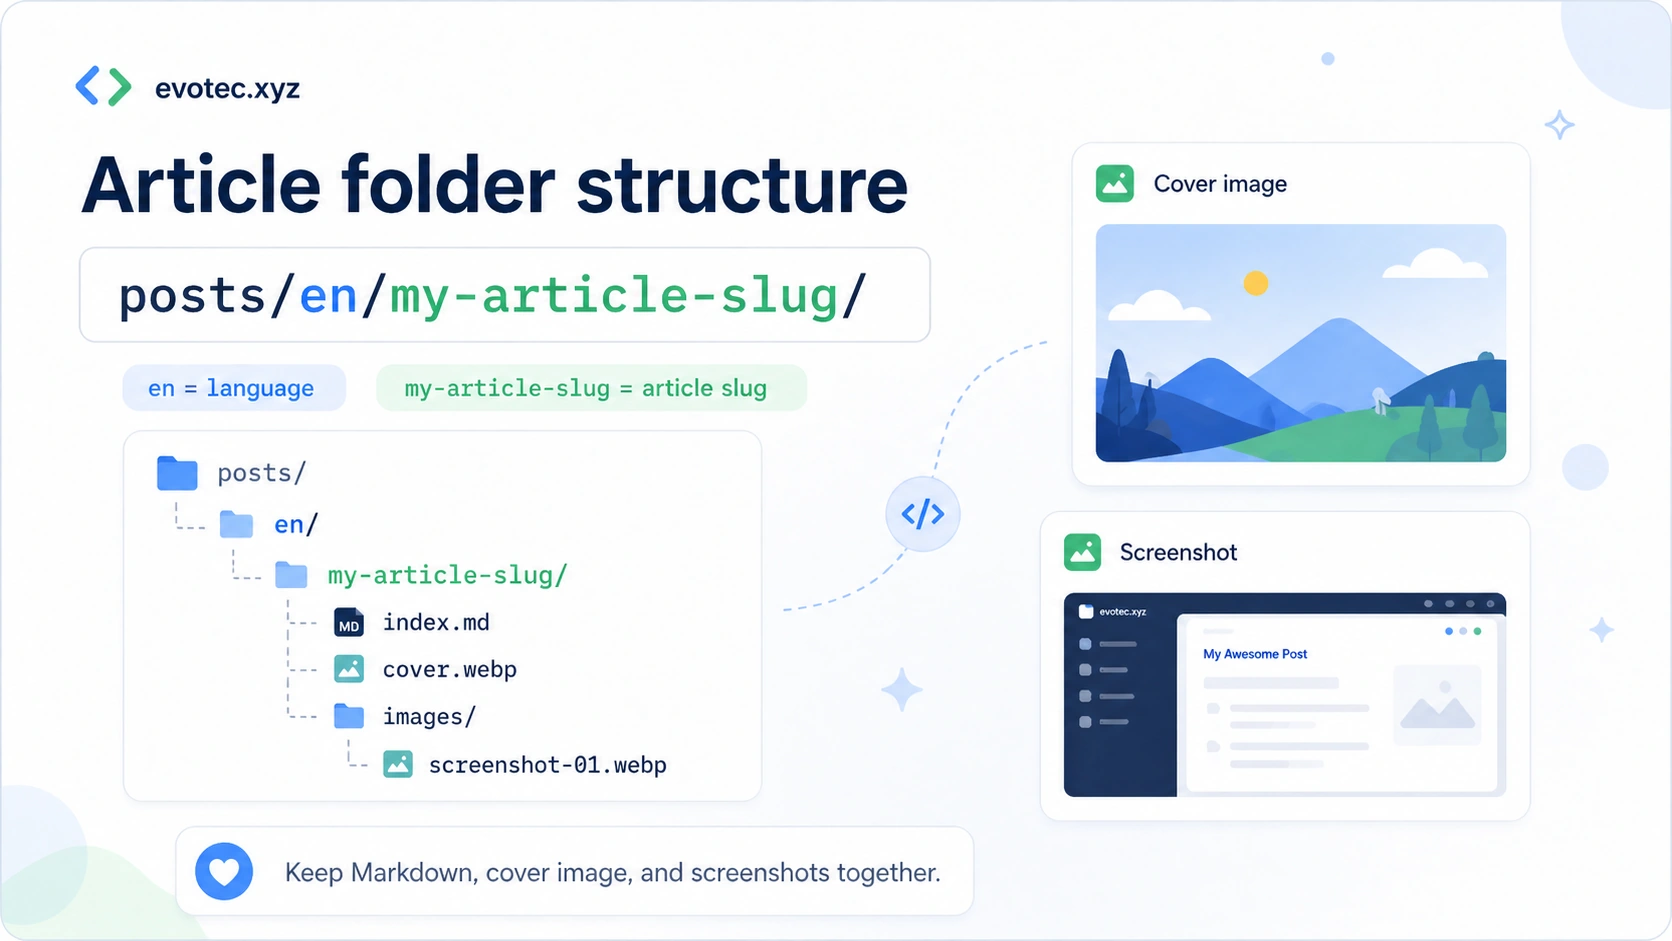
Keep everything for one article together in the same article folder.
That makes review easier and avoids confusion when maintainers import the article into the production website.
Step 6: Pick a Good Article Slug
The slug is the folder name used for your article.
Good slugs are:
- lowercase
- words separated by hyphens
- short but descriptive
- stable
Good examples:
how-to-check-dns-records
find-stale-ad-computers
troubleshooting-exchange-mail-flow
Avoid:
MyArticle
article1
test-post
new-final-version
A good slug should describe the topic clearly.
Step 7: Create index.md
Inside the article folder, create:
index.md
That file contains the article front matter and the actual content.
Here is a beginner-friendly starter template:
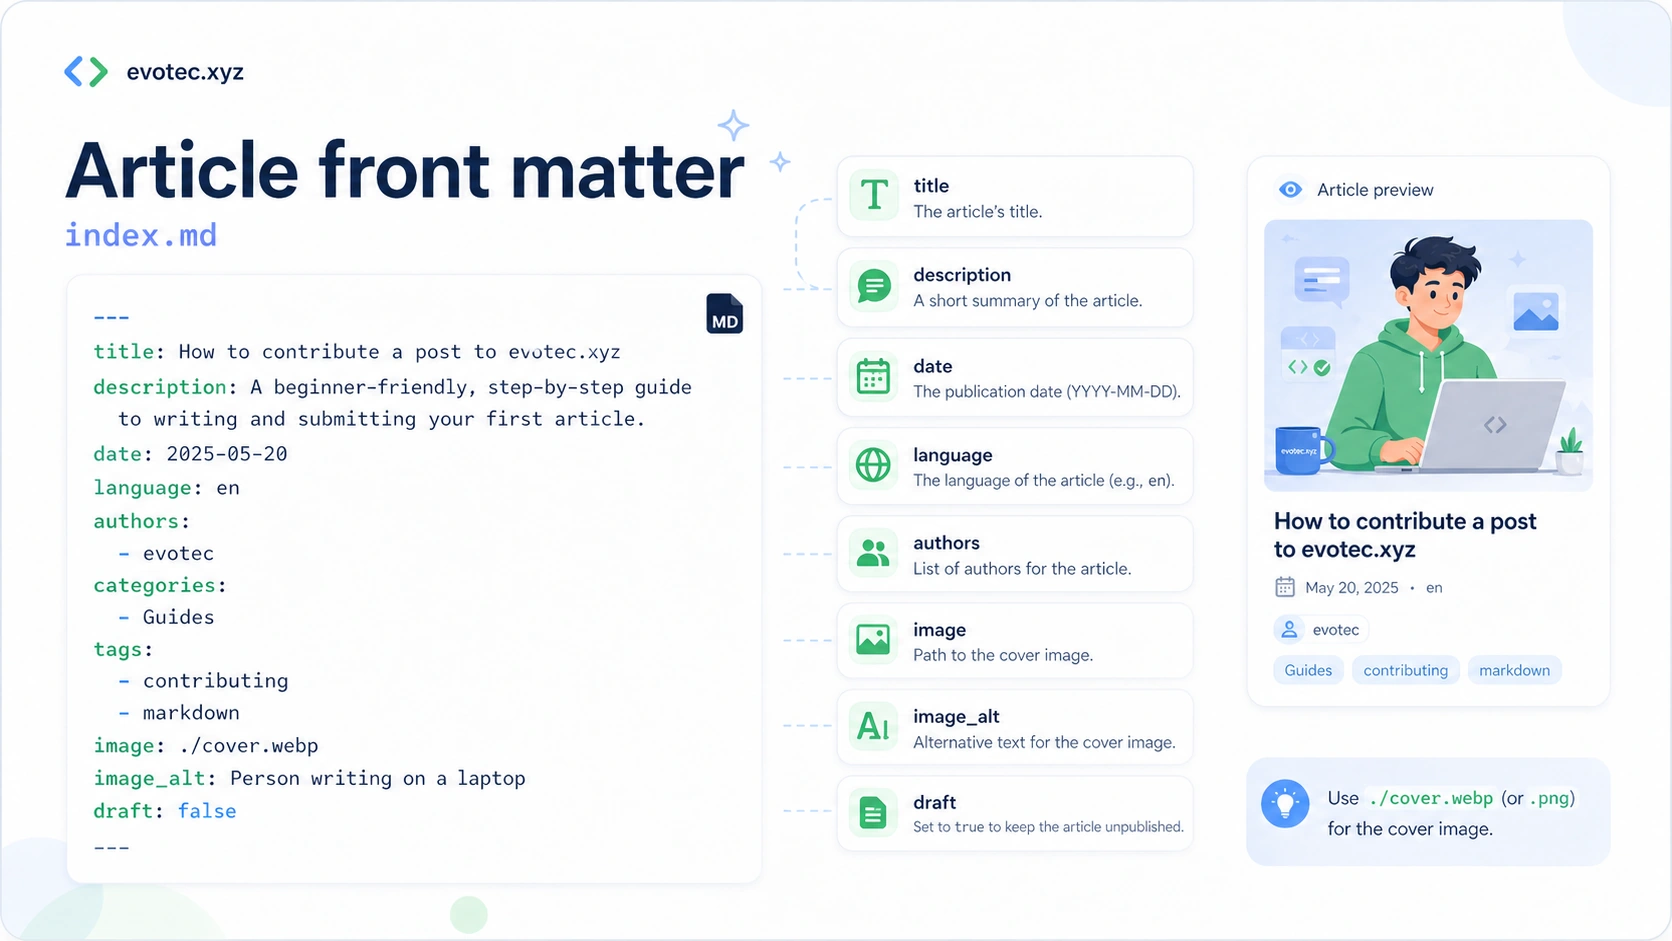
---
title: "Your Article Title"
description: "A short summary of what the article explains."
date: "2026-04-29"
language: "en"
authors:
  - your-name
categories:
  - PowerShell
tags:
  - powershell
  - automation
image: "./cover.webp"
image_alt: "Describe what the cover image shows"
draft: true
---

Start with a short introduction.

Explain what problem you had, why it mattered, and what the reader will learn.

## The Problem

Describe the situation clearly.

## The Solution

Explain the solution step by step.

## Example

Add code, screenshots, commands, or configuration examples.

## Result

Show what the reader should expect.

## Wrap-Up

Summarize the lesson and mention anything important to remember.
The front matter fields at the top describe the article.
Common fields are:
title— the article titledescription— a short summarydate— publication or preparation datelanguage— article language, for exampleenauthors— one or more author slugscategories— broader groupingtags— searchable keywordsimage— path to the cover imageimage_alt— alt text for the cover imagedraft— whether the post is still a draft
Step 8: Add the Cover Image
Place the cover image next to index.md.
For example:
posts/en/my-article-slug/
  index.md
  cover.webp
Accepted formats:
.webp
.png
.jpg
.jpeg
.gif
Prefer .webp when possible because it usually gives good quality with smaller file sizes.
Use .png when:
- the image contains small text that must stay extremely sharp
- the image is a diagram and
.webpmakes it blurry - the image contains UI elements or code that becomes hard to read in another format
If your cover is a normal illustration or banner, .webp is usually the best choice.
Preferred cover filename:
cover.webp
Also acceptable if needed:
cover.png
cover.jpg
cover.jpeg
cover.gif
Step 9: Add Screenshots and Other Images
Put screenshots in the images/ folder inside the article folder.
Example:
posts/en/my-article-slug/
  index.md
  cover.webp
  images/
    screenshot-01.webp
    powershell-output.png
    admin-center-setting.webp
Use descriptive names.
Good names:
images/install-module-command.webp
images/powershell-output.png
images/entra-admin-center-setting.webp
Avoid names like:
images/image1.png
images/final.png
images/test2.webp
Descriptive names help reviewers and future maintainers understand what each file is for.
Step 10: Link Images in Markdown
Use local relative paths only.
Good example:

Also good:

Avoid remote images:

Remote images are a bad fit because they can:
- disappear
- change
- be slow
- track readers
- break the article later
Alt Text Matters
Try to describe what the image shows.
Good:

Weak:

Alt text helps with accessibility and also makes the content more understandable when images do not load.
Step 11: Write the Article in a Practical Way
The best articles are practical and focused.
A useful structure is:
- What was the problem?
- Why did it matter?
- What did you do?
- What commands or steps were used?
- What result did you get?
- What should the reader watch out for?
That often turns into sections like this:
## The Problem
## Requirements
## Step-by-Step Solution
## Code Example
## Result
## Common Pitfalls
## Wrap-Up
Useful writing tips:
- keep paragraphs readable
- show exact commands when possible
- prefer real examples over vague advice
- explain portal paths clearly
- include screenshots if they help
- include expected output when useful
- mention permissions or requirements when they matter
- explain common mistakes
Example of a helpful portal path:
Microsoft Entra admin center
Identity > Applications > Enterprise applications > Consent and permissions
That kind of detail saves readers time.
Step 12: Remove Sensitive Information
Before you commit anything, review all screenshots and examples carefully.
Remove or blur:
- customer names
- tenant names
- internal hostnames
- private IP addresses if not needed
- email addresses
- tokens
- secrets
- passwords
- license keys
- personal data
- internal incident details that should not be public
Where possible, use:
- demo data
- lab environments
- redacted screenshots
- fake sample values
This matters a lot for technical and security-related articles.
Step 13: Commit Your Changes
How you do this depends on how you are editing.
If you use GitHub in the browser
When you add or edit files, GitHub will offer a Commit changes button.
Write a short commit message such as:
Add article about checking DNS records with PowerShell
Then commit the changes to your fork.
If you work locally
Typical commands look like this:
git add .
git commit -m "Add article about checking DNS records with PowerShell"
git push
That pushes your work to your fork on GitHub.
Step 14: Open a Pull Request
Once your changes are in your fork, open a pull request.
In simple terms, a pull request says:
I made these changes in my fork and I would like maintainers to review them.
A good pull request title might be:
Add article: How to check DNS records with PowerShell
A useful pull request description can be short:
This PR adds a new article about checking DNS records with PowerShell.
It includes the article markdown, cover image, screenshots, and author profile.
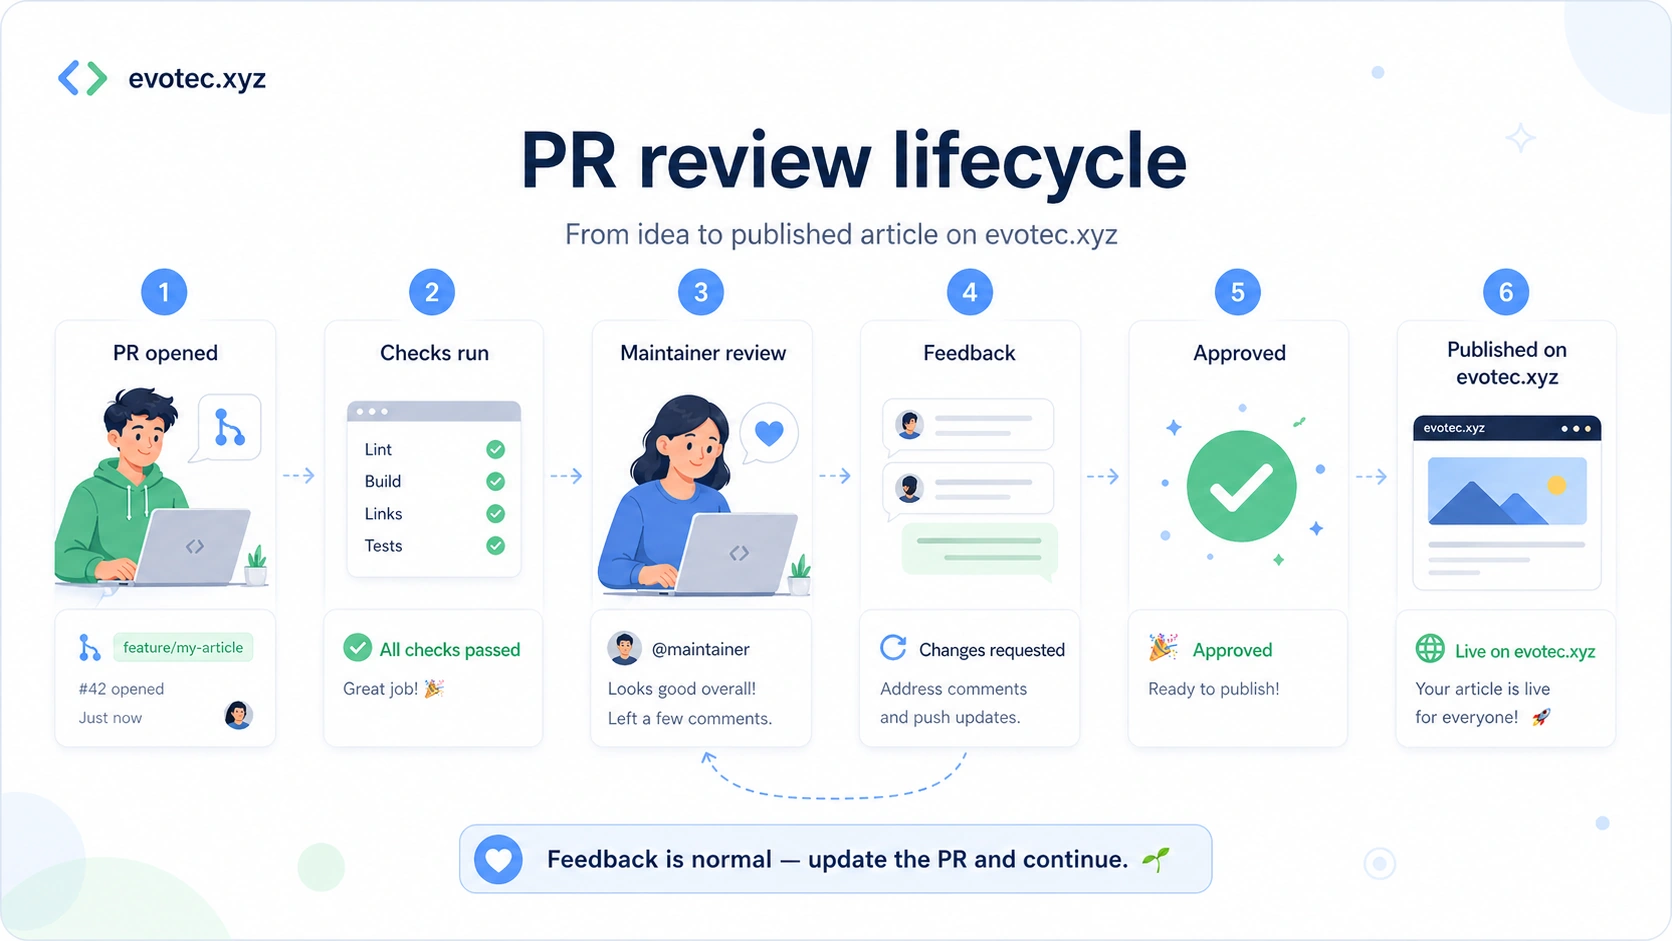
Step 15: Wait for Validation Checks
After the pull request is opened, GitHub Actions validates the contribution automatically.
Typical checks may include:
- article structure
- author profile presence
- image paths
- alt text
- file sizes
- expected folder layout
If a check fails, do not panic.
Usually it means something small needs to be corrected.
Common examples:
- missing author file
- wrong author slug
- broken image path
- missing alt text
- wrong folder structure
- image file too large
- article missing a required field
Fix the problem, commit again, and the pull request will update.
Step 16: Respond to Review Feedback
Sometimes a pull request is ready quickly.
Other times, maintainers may ask for improvements such as:
- clearer title
- better description
- safer screenshots
- more context
- better image naming
- cleaner formatting
- clearer alt text
That is a normal part of the process.
The goal is not to make contributing difficult. The goal is to make the final post safe, useful, and easy to publish.
Step 17: What Happens After Approval
If the article is accepted:
- maintainers merge or accept the contribution
- maintainers import it into the production website
- your author credit stays attached to the article
That part is handled by maintainers.
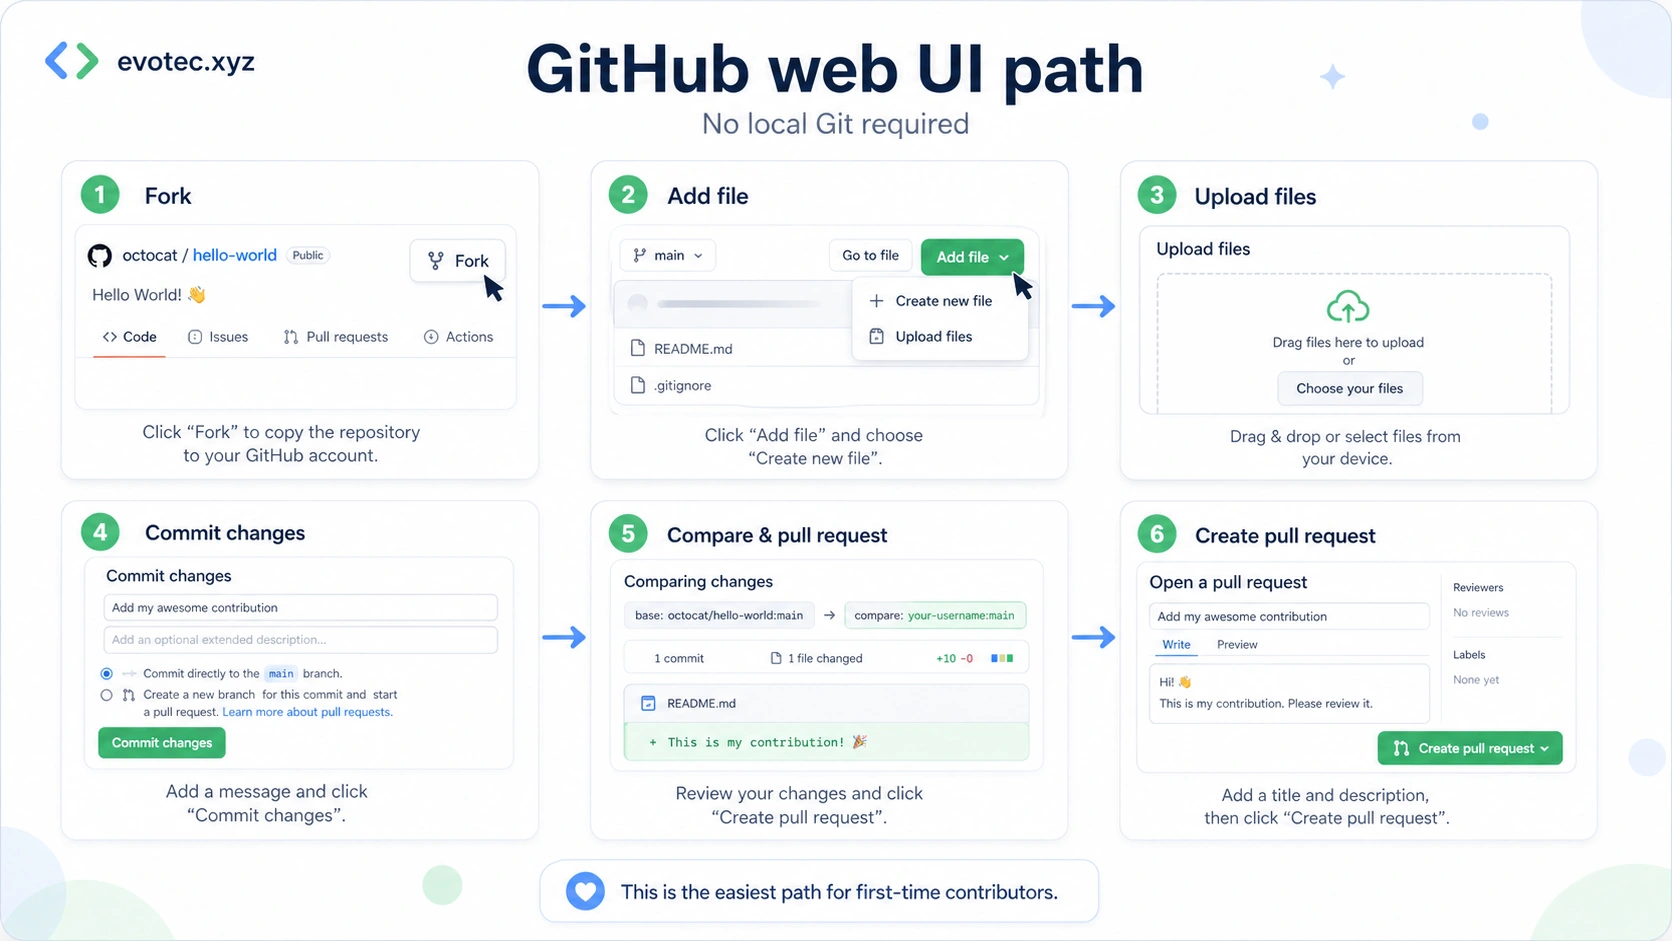
GitHub Web UI Path for Total Beginners
If you want the simplest possible approach, here is the beginner path:
- Open the repository on GitHub.
- Click Fork.
- Open your fork.
- Go to
authors/. - Create
your-name.yml. - Go to
posts/en/for English orposts/pl/for Polish. - Create your article folder.
- Add
index.md. - Upload
cover.webp, or another accepted local image format if needed. - Create
images/. - Upload screenshots into
images/. - Commit changes.
- Open a pull request.
- Wait for checks.
- Respond to feedback if needed.
This path is slower than local editing, but it is very friendly for first-time contributors.
Optional: Local Editing Path
If you prefer to work locally, the process is still simple:
- Fork the repository on GitHub.
- Clone your fork locally.
- Create the author profile.
- Create the article folder.
- Add
index.md. - Add the cover image and screenshots.
- Commit and push.
- Open a pull request.
The folder structure remains exactly the same.
Example Final Structure
Here is a complete example:
authors/your-name.yml

posts/en/how-to-check-dns-records/
  index.md
  cover.webp
  images/
    powershell-output.png
    dns-zone-result.webp
    admin-center-setting.webp
And here is how the article references the author:
authors:
  - your-name
And here is how it references an image:

FAQ
Do I need access to the website repository?
No. Start in the contribution repository. Maintainers handle the publishing step after review.
Can I write in English?
Yes.
Can I write in Polish?
Yes. Use posts/pl/ for Polish articles. The current blog contribution intake uses en and pl.
Should I use .webp or .png?
Use .webp when possible. Use .png when image clarity, sharp text, or diagram precision matters more. The validator also accepts .jpg, .jpeg, and .gif when those formats are a better fit.
Do I need to install Git?
No, not if you use the GitHub web interface.
Can I contribute even if I am new to Markdown?
Yes. A simple, clearly structured article is enough.
Can I update the article after opening the pull request?
Yes. Add more commits to your branch or update the files in GitHub. The pull request will update automatically.
What if GitHub Actions fails?
Open the failed check, read the message, fix the issue, and commit again.
Can I add more than one author?
Yes, if the repository and article format support it. Use multiple slugs in the authors section.
Example:
authors:
  - your-name
  - second-author
Can I submit an article without screenshots?
Yes, if screenshots are not needed. If screenshots help explain the topic, include them.
Can I use remote image URLs?
No. Keep images local to the article folder.
Troubleshooting
My image is not showing
Check:
- the file exists
- the filename matches exactly
- the path is correct
- the extension is correct
- you referenced
./images/...if the file is insideimages/
My author profile is not linked
Check:
- the author file exists in
authors/ - the slug is correct
- the article uses the same slug in front matter
I am not sure where the cover image goes
The cover image goes next to index.md, not inside images/.
Correct:
posts/en/my-article-slug/
  index.md
  cover.webp
  images/
I am not sure where screenshots go
Screenshots go inside images/.
I am not sure what language folder to use
Use en for English and pl for Polish. If you are unsure, use en.
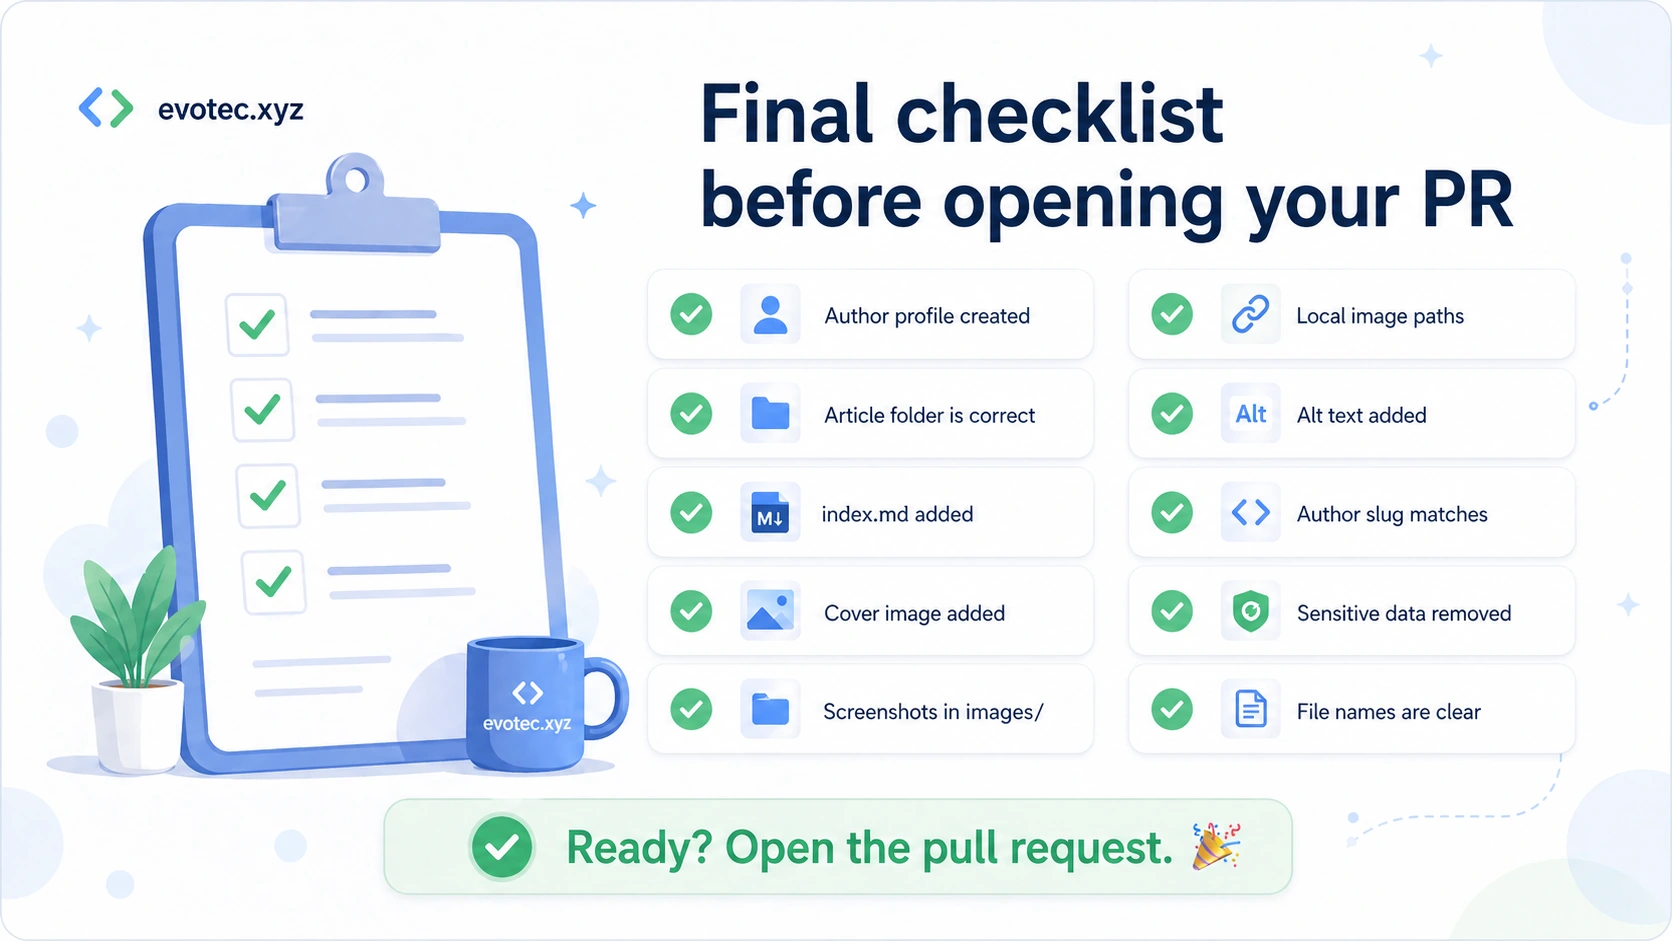
Final Checklist Before Opening a Pull Request
Before you open the pull request, check this list:
- I created or updated my author profile in
authors/ - Optional author avatar is under
authors/images/and referenced with a local path - My article is inside
posts/<language>/<article-slug>/ - The article file is named
index.md - The cover image is next to
index.md - Screenshots are inside the
images/folder - Image paths are local and correct
- Alt text is present and useful
- The article has front matter
- The author slug matches the author profile
- I removed any sensitive information from screenshots and examples
- Filenames are clear and descriptive
- The article explains a real problem or useful practical topic
Final Thoughts
The contribution process is meant to be simple:
- write in the contribution repository
- improve the article through review
- publish through maintainers
- keep publishing safe and consistent
- give contributors proper credit
If you have something useful to share, even if it is a small practical tip, that is enough to start.
A good technical article does not need to be huge. It just needs to be useful.