blog
Image Manipulation, Image Resize, Image Combine and more with PowerShell
Some years ago, I created a PowerShell module called PSWriteHTML with many options to make PowerShell output pretty. You can create charts, tables, and other HTML ways to display your content. It also has built-in functionality to create pretty emails. But there was one thing that always bothered me with emails. Mail clients are particular when parsing HTML and don't support much functionality. In emails, trying to display charts, gauges, or more advanced reporting that you would typically see when using PSWriteHTML would not be possible. This was when I had an idea that I would resort to displaying images in emails with the content I would like to see. I would create an image with a chart and add an image if I needed a chart. If I need a QR code or BarCode in an email, I would create an image and display it the same way. Well, it's easier said than done. Working with images is not as easy as it seems, and it took me a while to create something usable. While adding the feature I needed, I added some other features that seemed a good fit for the module. So today, I am introducing to you ImagePlayground – a PowerShell module that deals with all sorts of image capabilities.
💡 TL;DR
ImagePlayground is a PowerShell module that works in PowerShell 5.1 and PowerShell 7+. It works partially on Linux and should work on macOS, except for charts. That means it's partially cross-platform, but the end goal is to make it work fully on all platforms. So what can this module do?
- Resize Images (Resize-Image)
- Convert Images between formats (ConvertTo-Image)
- Combine Images (Merge-Image)
- Create three types of charts (Bar, Line, Pie) in their basic form
- Get Image Exif Data
- Set Image Exif Data
- Remove Image Exif Data
- Add a watermark as a text or an image
- Manipulate image By changing the background color,
- Making it black and white,
- Adding bokeh blur,
- Changing brightness and contrast
- Cropping
- Flipping
- Applying Gaussian Blur or Sharpening
- Making it GrayScale
- Applying Hue
- Making it OilPaint
- Making it Pixelate
- Making it look like an old Polaroid
- Resize
- Rotate
- Rotate and Flip
- Saturate
Create QR codes
- Standard QR Code
- WiFi QR Code
- Contact QR Code
Reading QR codes Reading Barcodes Create Barcodes
And that's about it for now.
💡 Reading and Writing Image QR Codes with PowerShell
Let's start with QR Codes. QRCodes from the outside are very simple, and most people would use them to create links to some content.
New-ImageQRCode -Content 'https://evotec.xyz' -FilePath "C:\Temp\QRCode.png"

But did you know you can create complicated QRCodes? Such as, WiFi QRCode allows you or your guests to point your phone to it and automatically connect to given WiFi. Or QR Code that, when scanned, will create a Contact? There are many different QR Code types, but we support only a few that I think could be useful.
New-ImageQRCodeWiFi -SSID 'Evotec' -Password 'Evotec' -FilePath "C:\Temp\QRCodeWiFi.png"
New-ImageQRContact -FilePath "C:\Temp\QRCodeContact.png" -outputType VCard4 -FirstName "Przemek" -Lastname "Klys" -MobilePhone "+48 500 000 000"

ImagePlaground not only can create QRCodes but also read them. You can use New-ImageQRCode to create a QR Code and Get-ImageQRCode to read it!
New-ImageQRContact -FilePath "$PSScriptRoot\Samples\QRCodeContact.png" -outputType VCard4 -Firstname "Przemek" -Lastname "Klys" -MobilePhone "+48 500 000 000"

$Message = Get-ImageQRCode -FilePath "$PSScriptRoot\Samples\QRCodeContact.png"
$Message | Format-List *

New-ImageQRCodeWiFi -SSID 'Evotec' -Password 'EvotecPassword' -FilePath "$PSScriptRoot\Samples\QRCodeWiFi.png"

$Message = Get-ImageQRCode -FilePath "$PSScriptRoot\Samples\QRCodeWiFi.png"
$Message | Format-List *

New-ImageQRCode -Content 'https://evotec.xyz' -FilePath "$PSScriptRoot\Samples\QRCode.png"

$Message = Get-ImageQRCode -FilePath "$PSScriptRoot\Samples\QRCode.png"
$Message | Format-List *
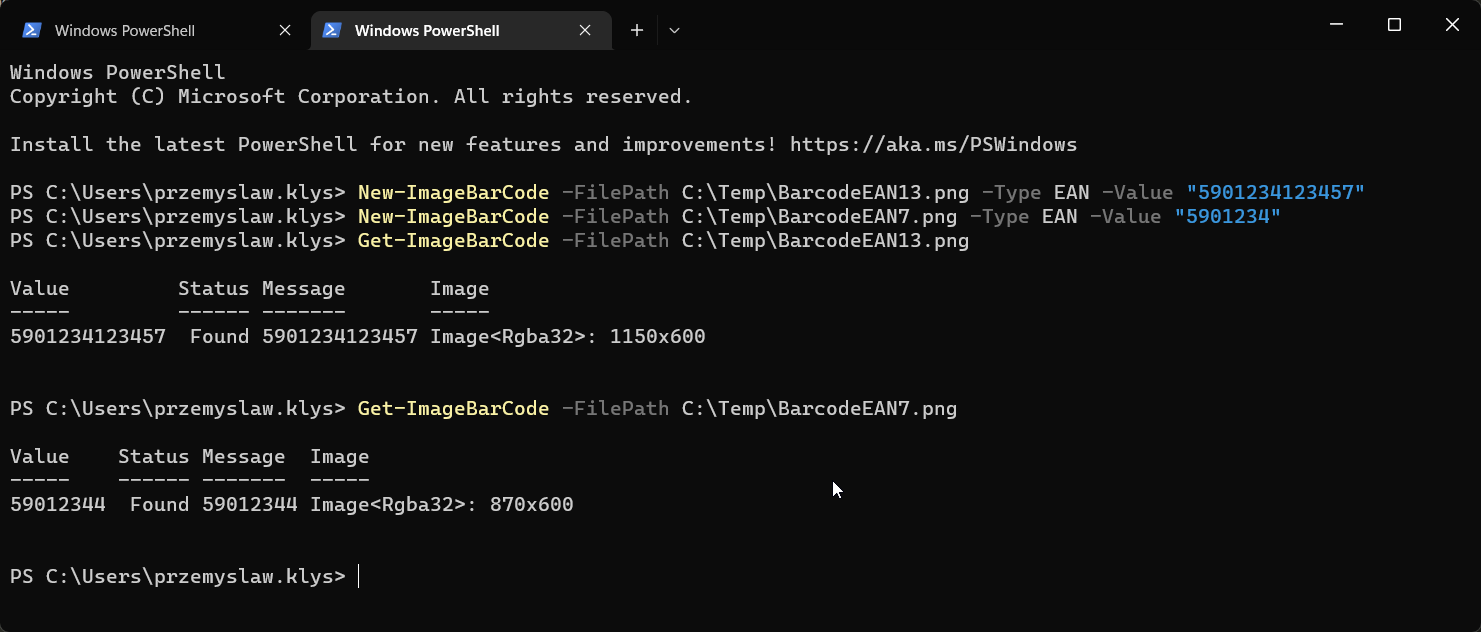
💡 Reading and Writing Image Bar Codes with PowerShell
Reading and writing bar codes is very similar to QR Codes. You can create them by using New-ImageBarCode and read them by using Get-ImageBarCode.
New-ImageBarCode -FilePath C:\Temp\BarcodeEAN13.png -Type EAN -Value "5901234123457"
New-ImageBarCode -FilePath C:\Temp\BarcodeEAN7.png -Type EAN -Value "5901234"

Get-ImageBarCode -FilePath C:\Temp\BarcodeEAN13.png
Get-ImageBarCode -FilePath C:\Temp\BarcodeEAN7.png
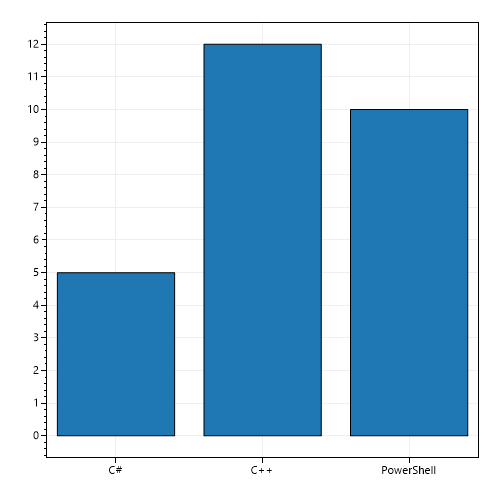
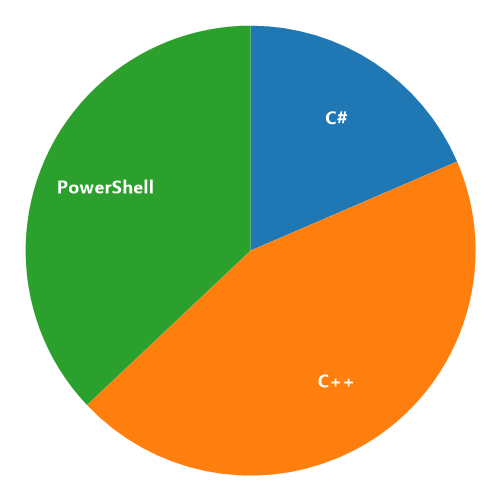
💡 Creating image with Bar Charts, Line Charts and Pie Charts
ImagePlayground supports three basic charts: Line Charts, Bar Charts and Pie Charts. While it's possible to create a lot more, I believe in the beginning, and it should be enough for my needs.
New-ImageChart {
    New-ImageChartBar -Value 5 -Label "C#"
    New-ImageChartBar -Value 12 -Label "C++"
    New-ImageChartBar -Value 10 -Label "PowerShell"
} -Show -FilePath $PSScriptRoot\Samples\ChartsBar1.png
New-ImageChart {
    New-ImageChartPie -Name "C#" -Value 5
    New-ImageChartPie -Name "C++" -Value 12
    New-ImageChartPie -Name "PowerShell" -Value 10
} -Show -FilePath $PSScriptRoot\Output\ChartsPie1.png -Width 500 -Height 500
New-ImageChart {
    New-ImageChartLine -Value 5, 10, 12, 18, 10, 13 -Name "C#"
    New-ImageChartLine -Value 10,15,30,40,50,60 -Name "C++"
    New-ImageChartLine -Value 10,5,12,18,30,60 -Name "PowerShell"
} -Show -FilePath $PSScriptRoot\Output\ChartsLine1.png

As you can see from the examples above, building charts is done similarly to what PSWriteHTML preaches. Depending on what commands you use within New-ImageChart, you get either Line, Bar, or Pie Chart. You can also control width and height to ensure the image is sized correctly.
💡 Converting, Combining or Resizing Images with PowerShell
ImagePlaground could be helpful for its ability to Combine, Resize or Convert images between formats. It all can be done using ConvertTo-Image, Resize-Image, and Merge-Image PowerShell functions. Those functions are elementary to use with very few parameters.
ConvertTo-Image -FilePath $PSScriptRoot\Samples\LogoEvotec.png -OutputPath $PSScriptRoot\Output\LogoEvotec.jpg
ConvertTo-Image takes two parameters** input path** and output path. Depending on the file's extension, it will try to convert to a given type. It supports following types:
- JPG/JPEG
- BMP
- GIF
- PBM
- TGA
- TIFF
- WEBP
Merge-Image is very similar. It has five parameters, but only three are mandatory. It requires FilePath, FilePathToMerge, and FilePathOutput. This ensures that two images are merged and applied to the bottom of the first image. Of course, a new image is created, leaving the other two untouched. There are also two more parameters. One is ResizeToFit which ensures that the smaller image is resized to match the edge of the larger picture. Of course, it's not necessary, but then depending on the dimensions of the image, the merge may not look great.
On the other hand, resizing an image may cause display issues. The image is resized proportionally on both edges to maintain the aspect ratio. There's also a Placement parameter that decides where the images bind together. By default, the binding is done on the bottom of the first image but you can choose Left, Right, Bottom or Top.
$mergeImageSplat = @{
    FilePath        = "$PSScriptRoot\Samples\BarcodeEAN13.png"
    FilePathToMerge = "$PSScriptRoot\Samples\BarcodeEAN7.png"
    FilePathOutput  = "$PSScriptRoot\Output\BarcodeEAN13-7.png"
    ResizeToFit     = $true
    Placement       = 'Bottom'
}

Merge-Image @mergeImageSplat


$mergeImageSplat = @{
    FilePath        = "$PSScriptRoot\Samples\ChartsBar.png"
    FilePathToMerge = "$PSScriptRoot\Samples\LogoEvotec.png"
    FilePathOutput  = "$PSScriptRoot\Output\MergedImage.png"
    ResizeToFit     = $true
    Placement       = 'Left'
}

Merge-Image @mergeImageSplat
For display purposes, I'm using splatting to show all parameters. Finally, we have the Resize-Image function, which provides an easy way to resize any image either by Width or Height, or both Width and Height, or by percentage.
Resize-Image -FilePath $PSScriptRoot\Samples\LogoEvotec.png -OutputPath $PSScriptRoot\Output\LogoEvotecResize.png -Width 100 -Height 100

Resize-Image -FilePath $PSScriptRoot\Samples\LogoEvotec.png -OutputPath $PSScriptRoot\Output\LogoEvotecResizeMaintainAspectRatio.png -Width 300

Resize-Image -FilePath $PSScriptRoot\Samples\LogoEvotec.png -OutputPath $PSScriptRoot\Output\LogoEvotecResizeMaintainAspectRatio.png -Width 300 -DontRespectAspectRatio

Resize-Image -FilePath $PSScriptRoot\Samples\LogoEvotec.png -OutputPath $PSScriptRoot\Output\LogoEvotecResizePercent.png -Percentage 200
When the percentage is in use, the aspect ratio is always preserved. If both Width and Height are provided simultaneously, the function assumes you know what you want and what you're doing. If only width or height is provided, it will resize the image appropriately to ensure it fits the given edge but then respect the aspect ratio to ensure the image scales well. Finally, there's the DontRespectAspectRatio parameter which goes along with Width or Height and allows you to change only one edge if that's your desire.
💡 Image Manipulation using PowerShell
One of the last features that ImagePlayground provides is image manipulation. Since it's possible one would like to do more things to a single image, I've created two functions, Get-Image and Save-Image. The first loads the image, which can be manipulated using multiple available methods, and the second makes sure the image is saved. Simple enough, right?When Get-Image is used, it returns an Image object. Once the thing is in memory, you can apply multiple methods to a single image (or just one). Those methods as of today are:
- AdaptiveThreshold
- AddImage
- AddText
- AutoOrient
- BackgroundColor
- BlackWhite
- BokehBlur
- BoxBlur
- Brightness
- Contrast
- Crop
- Filter
- Flip
- GaussianBlur
- GaussianSharpen
- GetTextSize
- Grayscale
- Hue
- OilPaint
- Pixelate
- Polaroid
- Resize
- Rotate
- RotateFlip
- Saturate
- Watermark
- WatermarkImage
You could argue that I was lazy and didn't create specific functions so that the method used is more straightforward, but I thought it might not be the end of the world if you use methods instead of functions 🙂 The following example shows how to apply the BlackWhite method and BackgroundColor. Remember that applying Background color will only work on specific types of files and will most likely require a transparent background.
$Image = Get-Image -FilePath $PSScriptRoot\Samples\LogoEvotec.png
$Image.BlackWhite()
$Image.BackgroundColor("Red")
Save-Image -Image $Image -Open -FilePath $PSScriptRoot\Output\LogoEvotecChanged.png
You can also take an image and Pixelate it!
$Image = Get-Image -FilePath $PSScriptRoot\Samples\PrzemyslawKlysAndKulkozaurr.jpg
$Image.Pixelate(30)
Save-Image -Image $Image -Open -FilePath $PSScriptRoot\Output\PrzemyslawKlysAndKulkozaurrPixelate.jpg
Or add a Polaroid effect.
$Image = Get-Image -FilePath $PSScriptRoot\Samples\PrzemyslawKlysAndKulkozaurr.jpg
$Image.Polaroid()
Save-Image -Image $Image -Open -FilePath $PSScriptRoot\Output\PrzemyslawKlysAndKulkozaurrPolaroid.jpg
Remember that you can apply all sorts of manipulations of an image in a single run. It's possible to resize an image, add a watermark to it, pixelate it, and rotate it just before saving it!
# Add watermark
$Image = Get-Image -FilePath $PSScriptRoot\Samples\PrzemyslawKlysAndKulkozaurr.jpg
$Image.WatermarkImage("$PSScriptRoot\Samples\LogoEvotec.png",[ImagePlayground.Image+WatermarkPlacement]::Middle, 0.5, 0.5)
# Add watermark with rotation 90 degrees
$Image.WatermarkImage("$PSScriptRoot\Samples\LogoEvotec.png",[ImagePlayground.Image+WatermarkPlacement]::TopLeft, 1, 18, 90)
# Resize 200% in the same image
$Image.Resize(200)
# Rotate 30 degrees in the same image
$Image.Rotate(30)
Save-Image -Image $Image -Open -FilePath $PSScriptRoot\Output\PrzemyslawKlysAndKulkozaurrWatermark.jpg
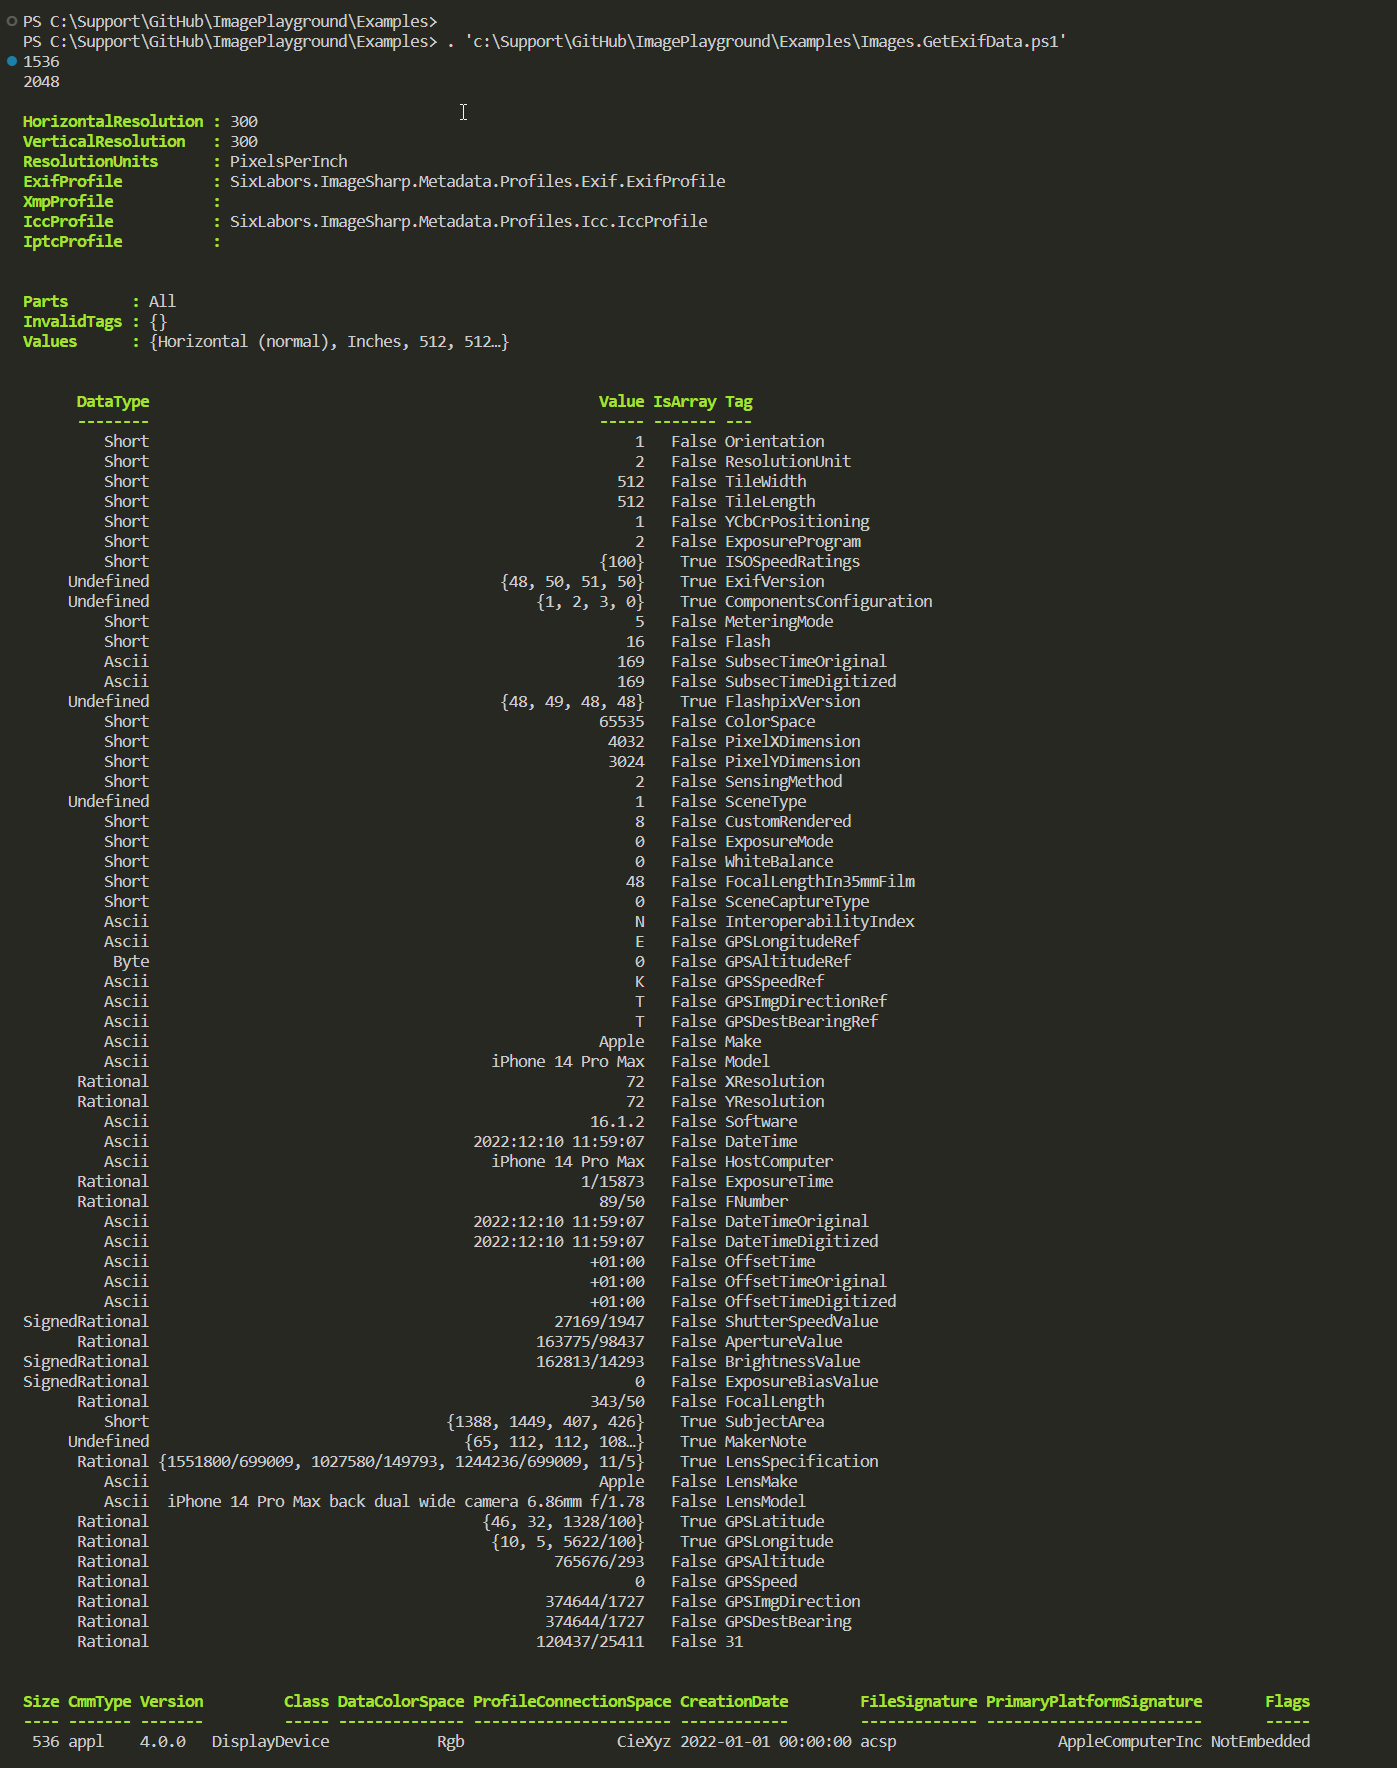
💡 Image EXIF data
ImagePlayground also supports extracting EXIF data. EXIF data is stored in every image your phone or new camera produces. It adds information about camera type, resolution, GPS latitude and longitude, GPS Altitude, and many others.
You can also remove Exif Data using Remove-ImageExif function. You can do so by removing the specific tag or all tags.
# get tags to see whats there now
Get-ImageExif -FilePath "C:\Users\przemyslaw.klys\Downloads\IMG_4644.jpeg" | Format-Table

# remove specifc tag
$removeImageExifSplat = @{
    FilePath       = "C:\Users\przemyslaw.klys\Downloads\IMG_4644.jpeg"
    ExifTag        = [SixLabors.ImageSharp.Metadata.Profiles.Exif.ExifTag]::GPSLatitude, [SixLabors.ImageSharp.Metadata.Profiles.Exif.ExifTag]::GPSLongitude
    FilePathOutput = "$PSScriptRoot\Output\IMG_46441.jpeg"
}
Remove-ImageExif @removeImageExifSplat

# remove all tags
$removeImageExifSplat = @{
    FilePath       = "C:\Users\przemyslaw.klys\Downloads\IMG_4644.jpeg"
    All            = $true
    FilePathOutput = "$PSScriptRoot\Output\IMG_46442.jpeg"
}
Remove-ImageExif @removeImageExifSplat

# Verify the tags were removed
Get-ImageExif -FilePath $PSScriptRoot\Output\IMG_46441.jpeg | Format-Table
Get-ImageExif -FilePath $PSScriptRoot\Output\IMG_46442.jpeg | Format-Table
I've also added a command that can overwrite Exif data with new data; however, finding the proper value type and how to save it, so it's accepted is a bit more demanding and requires figuring out what will be taken for a given tag. Here's an example of overwriting the DateTime of an image using Set-ImageExif.
Get-ImageExif -FilePath "C:\Users\przemyslaw.klys\Downloads\IMG_4644.jpeg" -Translate | Format-List Datetime*, GPS*

$setImageExifSplat = @{
    FilePath       = "C:\Users\przemyslaw.klys\Downloads\IMG_4644.jpeg"
    ExifTag        = ([SixLabors.ImageSharp.Metadata.Profiles.Exif.ExifTag]::DateTimeOriginal)
    Value          = ([DateTime]::Now).ToString("yyyy:MM:dd HH:mm:ss")
    FilePathOutput = "$PSScriptRoot\Output\IMG_4644.jpeg"
}

Set-ImageExif @setImageExifSplat

Get-ImageExif -FilePath $PSScriptRoot\Output\IMG_4644.jpeg -Translate | Format-List Datetime*, GPS*
💡 Installing / Updating ImagePlayground
ImagePlayground is available from PowerShellGallery or a download from GitHub. I do recommend PowerShellGallery as the source for daily work and GitHub if you wish to play with sources or want to expand what is already there.
Install-Module ImagePlayground -Force -Verbose
When you use Force, the module will be installed, but when you rerun the command, it will redownload it repeatedly. If there's a new version, it will download the more recent version and leave the old one in place. This makes sure your module is always up to date. Of course, you shouldn't blindly update modules in production. Please test every version before doing the Install-module/Update-module in production.
Install-Module ImagePlayground -Scope CurrentUser
This module doesn't require Administrative rights on the machine, so you can use the CurrentUser scope as shown above to install it as a standard user.