blog
Nested Tabs, Diagram Updates, Diagram Events, Calendar Object and more in PSWriteHTML
Sunday is usually a release day for me. While I do release** module updates** during the week, I very rarely do a writeup on it. In the last two weeks, I've worked on a couple of features that I find will be useful to my projects, and hopefully, you will see a benefit for your projects as well. As I don't have much time in the last few weeks, let's not make this a long introduction even longer.
💡 PSWriteHTML – Diagram Events
One of the new features I've worked on was connecting Diagrams with Tables. Someone suggested, and I thought it would be cool to be able to click on the Diagram node and find more details about it in a table next to it. But then I thought it would be even cooler if you could have multiple tables linked to one Diagram. For example, below, I've created two tables with Users and Computers and populated Diagram with that data.
I've also added Calendar (oh right, did I mention it's available now?) to be able to show some events on it if needed.
$Computers = Get-ADComputer -Filter * -Properties OperatingSystem, OperatingSystemVersion, PasswordLastSet | Select-Object -Property DNSHostName, Name, Enabled, OperatingSystem, OperatingSystemVersion, PasswordLastSet
$Users = Get-ADUser -Filter * -Properties SamAccountName, Name, Title, Surname, PasswordNeverExpires, WhenCreated, WhenChanged | Select-Object UserPrincipalName, SamAccountName, Name, Title, Surname, PasswordNeverExpires, WhenCreated, WhenChanged #-First 17

New-HTML -TitleText 'My Title' -UseCssLinks:$true -UseJavaScriptLinks:$true -FilePath $PSScriptRoot\Example30-LinkedTable.html -ShowHTML {
    #New-HTMLLogo
    New-HTMLTabOptions -SelectorColor Grey
    New-HTMLTab -TabName 'Test' -IconSolid dice {
        New-HTMLContent -HeaderText 'Active Directory Computers & Diagram' -HeaderBackGroundColor Grey {
            New-HTMLPanel {
                New-HTMLTable -DataTable $Computers -DataTableID 'OtherTable'
            }
            New-HTMLPanel {
                New-HTMLDiagram {
                    New-DiagramNode -Label 'Domain' -To 'AD Computers', 'AD Users' -IconBrands delicious
                    New-DiagramNode -Label 'AD Computers' -IconBrands apple
                    New-DiagramNode -Label 'AD Users' -IconBrands instagram
                    New-DiagramEvent -ID 'SpecialID123' -ColumnID 1 #5-FadeSearch
                    New-DiagramEvent -ID 'OtherTable' -ColumnID 1
                    foreach ($_ in $Computers) {
                        if ($_.OperatingSystem -like '*Server*') {
                            New-DiagramNode -Label $_.Name -IconSolid server -To 'AD Computers'
                        } else {
                            New-DiagramNode -Label $_.Name -IconSolid desktop -To 'AD Computers'
                        }
                    }
                    foreach ($_ in $Users) {
                        New-DiagramNode -Label $_.SamAccountName -To 'AD Users' -IconRegular user-circle
                    }
                }
            }
        }
        New-HTMLSection -HeaderText 'Active Directory Users' -HeaderBackGroundColor Grey {
            New-HTMLPanel {
                New-HTMLTable -DataTable $Users -DataTableID 'SpecialID123' #-DisablePaging
            }
            New-HTMLPanel {
                New-HTMLCalendar {
                    foreach ($_ in $Users) {
                        New-CalendarEvent -StartDate $_.WhenCreated -Title "User: $($_.SamAccountName)" -Description "User $($_.Name) created on $($_.WhenCreated)"
                        New-CalendarEvent -StartDate $_.WhenChanged -Title "User: $($_.SamAccountName)" -Description "User $($_.Name) modified on $($_.WhenChanged)"
                    }
                    foreach ($_ in $Computers) {
                        New-CalendarEvent -StartDate $_.PasswordLastSet -Title "Computer $($_.SamAccountName)" -Description "Computer $($_.DNSHostName) password last set $($_.PasswordLastSet)"
                    }
                }
            }
        }

    }
}
While the example above may be a tad complicated, and you may think linking Tables to Diagram is hard, it isn't. Linking two tables on ColumnID is just a matter of two simple lines.
New-DiagramEvent -ID $DataTableIDUsers -ColumnID 1
New-DiagramEvent -ID $DataTableIDComputers -ColumnID 1
As you see above, there are two parameters. One is called ID and one ColumnID. The ID is related to table ID, and ColumnID is just a column index. Table ID in standard usage is automatically generated, and you usually shouldn't care about it. But for linking Diagram with Table, it's necessary to be able to tell which table is related to a Diagram as there may be multiple Diagrams and multiple Tables. This means when you define New-HTMLTable, you need to set random DataTableID that you then pass to the New-DiagramEvent ID parameter.
$DataTableIDComputers = Get-Random -Minimum 100000 -Maximum 2000000
New-HTMLTable -DataTable $Computers -DataTableID $DataTableIDComputers
To give you a bit simpler example – this one should show how it works without all the complicated stuff.
$Processes = Get-Process | Select-Object -First 10
$TableID = 'RandomID'

New-HTML -TitleText 'My Title' -UseCssLinks -UseJavaScriptLinks -FilePath $PSScriptRoot\Example30-LinkedProcesses.html -ShowHTML {
    New-HTMLSection -Invisible {
        New-HTMLPanel {
            New-HTMLTable -DataTable $Processes -DataTableID $TableID
        }
        New-HTMLPanel {
            New-HTMLDiagram -Height '1000px' {
                New-DiagramEvent -ID $TableID -ColumnID 1
                New-DiagramNode -Label 'Processes' -IconBrands delicious
                foreach ($_ in $Processes) {
                    New-DiagramNode -Label $_.ProcessName -Id $_.Id -To 'Processes'
                }
            }
        }
    }
}
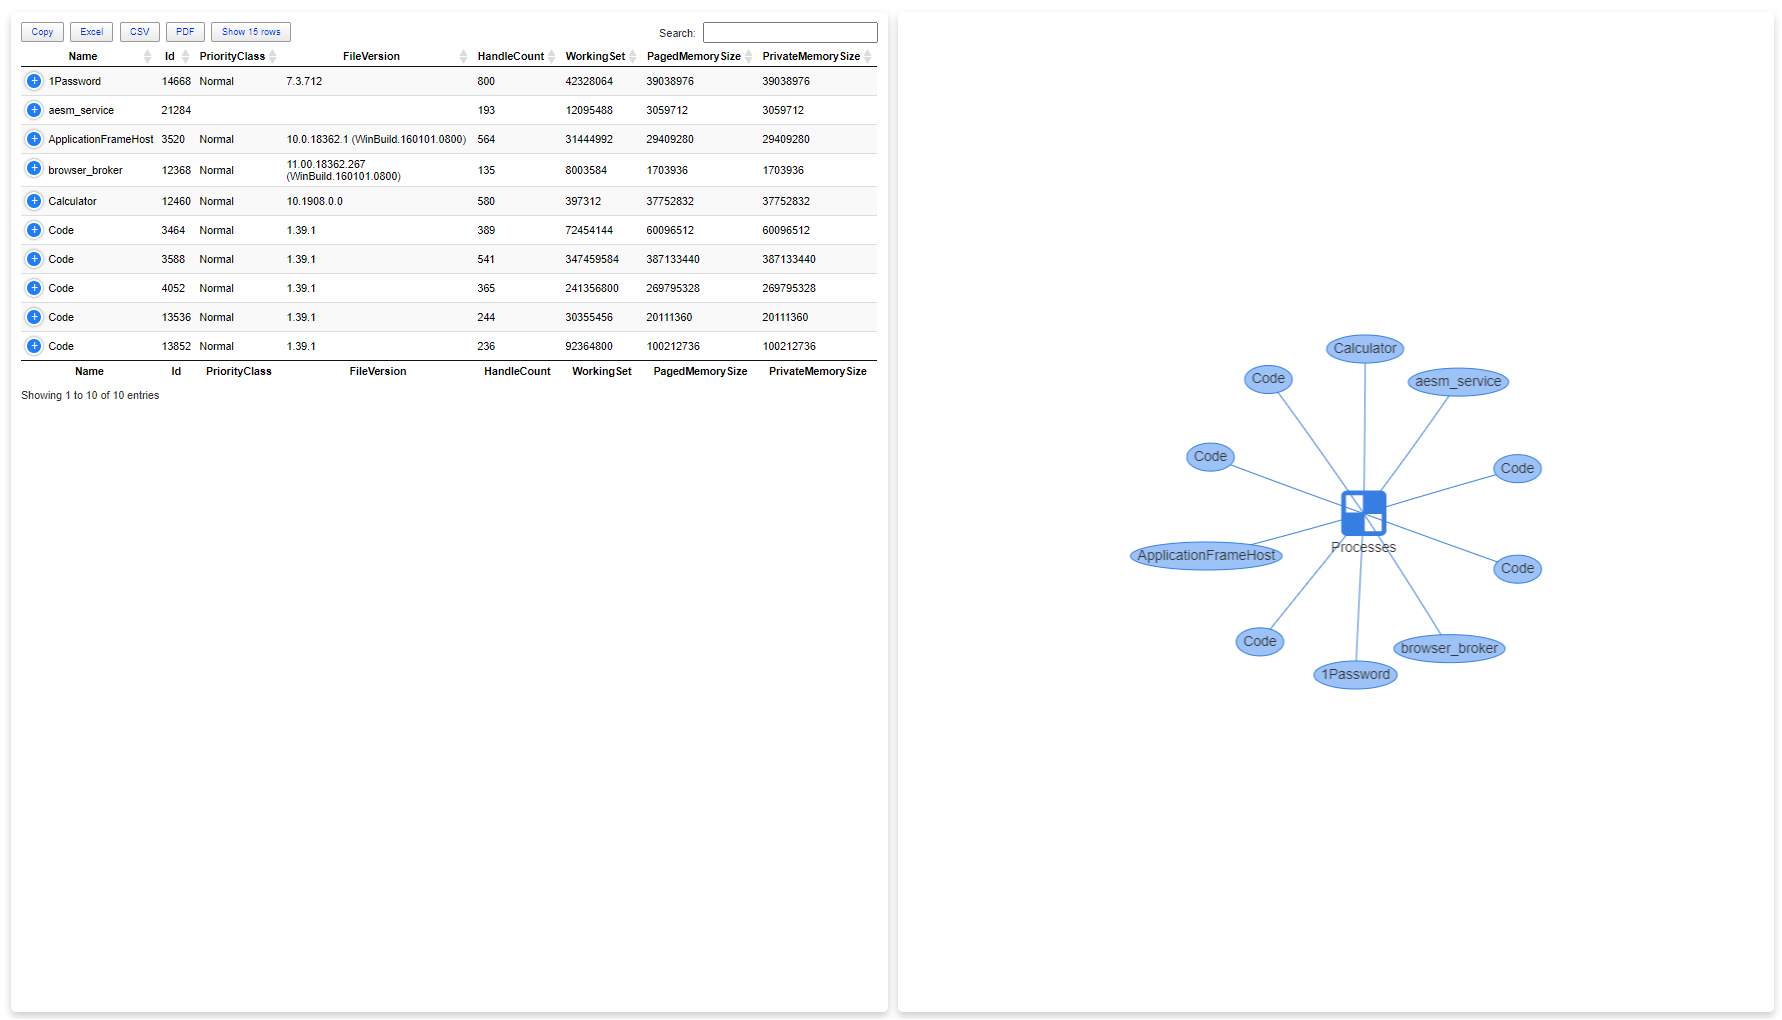
Anytime you click on a node, the table on the left will trigger a match and show your choice.
💡 PSWriteHTML – Nested Tabs
To show you nested tabs, I'm going to use another example. It is almost the same code I've used above, but in this case, I've queried two domains that I've within one forest as you can see it created Tabs for each domain separately and then within each domain it created Computers and Users tabs. You could go multilevel deep and split computers into Servers and Desktops.
I've also spiced up diagrams a bit to add some colors — used green, yellow, gray for a different type of object on the Diagram.
$Forest = Get-ADForest
New-HTML -TitleText 'My Title' -UseCssLinks:$true -UseJavaScriptLinks:$true -FilePath $PSScriptRoot\Example30-NestedTabs.html -ShowHTML {
    New-HTMLTabOptions -SelectorColor Grey
    foreach ($Domain in $Forest.Domains) {
        $Computers = Get-ADComputer -Server $Domain -Filter * -Properties OperatingSystem, OperatingSystemVersion, PasswordLastSet | Select-Object -Property DNSHostName, Name, Enabled, OperatingSystem, OperatingSystemVersion, PasswordLastSet
        $Users = Get-ADUser -Server $Domain -Filter * -Properties SamAccountName, Name, Title, Surname, PasswordNeverExpires, WhenCreated, WhenChanged | Select-Object UserPrincipalName, SamAccountName, Name, Title, Surname, PasswordNeverExpires, WhenCreated, WhenChanged #-First 17
        $DataTableIDUsers = Get-Random -Minimum 100000 -Maximum 2000000
        $DataTableIDComputers = Get-Random -Minimum 100000 -Maximum 2000000

        New-HTMLTab -TabName "Domain $Domain" -IconSolid dice {
            New-HTMLTab -TabName 'Computers' {
                New-HTMLContent -HeaderText 'Active Directory Computers & Diagram' -HeaderBackGroundColor Grey {
                    New-HTMLPanel {
                        New-HTMLTable -DataTable $Computers -DataTableID $DataTableIDComputers
                    }
                    New-HTMLPanel {
                        New-HTMLDiagram {
                            New-DiagramNode -Label 'Domain' -To 'AD Computers', 'AD Users' -IconBrands delicious -IconColor Red
                            New-DiagramNode -Label 'AD Computers' -IconBrands apple -IconColor Black
                            New-DiagramNode -Label 'AD Users' -IconBrands instagram -IconColor Yellow
                            New-DiagramEvent -ID $DataTableIDUsers -ColumnID 1
                            New-DiagramEvent -ID $DataTableIDComputers -ColumnID 1
                            foreach ($_ in $Computers) {
                                if ($_.OperatingSystem -like '*Server*') {
                                    New-DiagramNode -Label $_.Name -IconSolid server -To 'AD Computers' -IconColor Green
                                } else {
                                    New-DiagramNode -Label $_.Name -IconSolid desktop -To 'AD Computers' -IconColor Gray
                                }
                            }
                            foreach ($_ in $Users) {
                                New-DiagramNode -Label $_.SamAccountName -To 'AD Users' -IconRegular user-circle
                            }
                        }
                    }
                }
            }
            New-HTMLTab -Name 'Users' {
                New-HTMLSection -HeaderText 'Active Directory Users' -HeaderBackGroundColor Grey {
                    New-HTMLPanel {
                        New-HTMLTable -DataTable $Users -DataTableID $DataTableIDUsers
                    }
                    New-HTMLPanel {
                        New-HTMLCalendar {
                            foreach ($_ in $Users) {
                                New-CalendarEvent -StartDate $_.WhenCreated -Title "User: $($_.SamAccountName)" -Description "User $($_.Name) created on $($_.WhenCreated)"
                                New-CalendarEvent -StartDate $_.WhenChanged -Title "User: $($_.SamAccountName)" -Description "User $($_.Name) modified on $($_.WhenChanged)"
                            }
                            foreach ($_ in $Computers) {
                                New-CalendarEvent -StartDate $_.PasswordLastSet -Title "Computer $($_.SamAccountName)" -Description "Computer $($_.DNSHostName) password last set $($_.PasswordLastSet)"
                            }
                        }
                    }
                }
            }
        }
    }
}
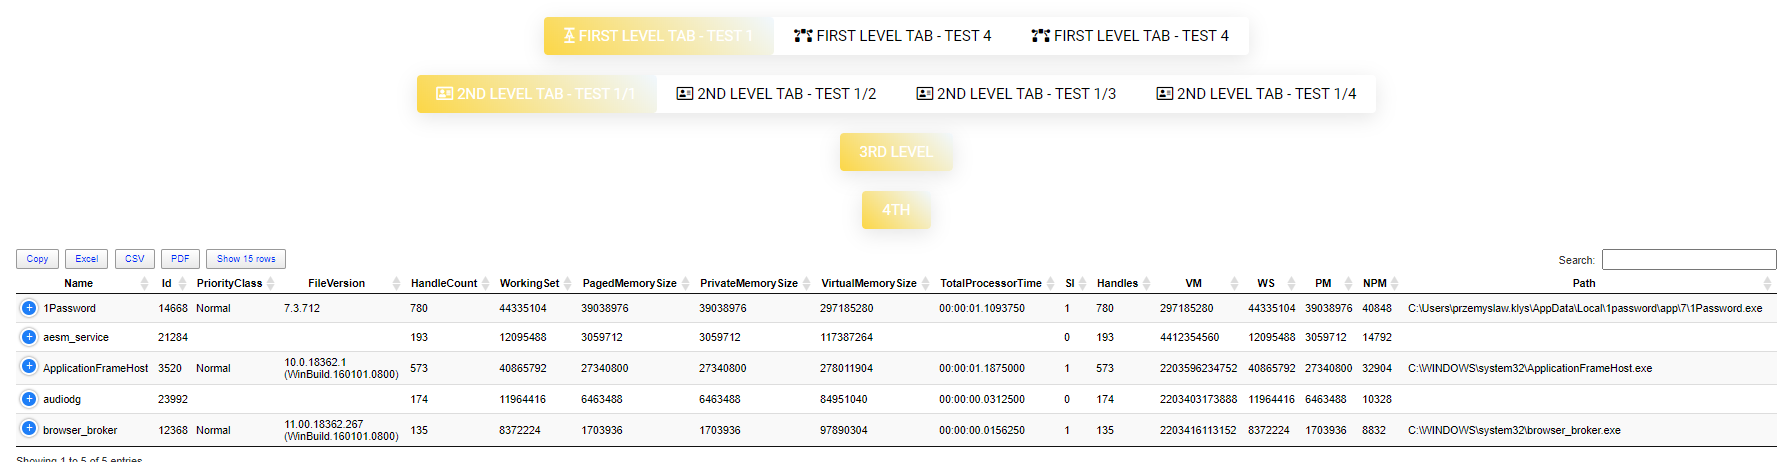
💡 PSWriteHTML – Multiple Levels of Nested Tabs
Nested tabs don't work with only 1 level. You can have as many levels as you want, making it much easier to separate content. Below most of the tabs are just two levels, but in one case, I've added 4th level.
$Test1 = Get-Process | Select-Object -First 5

New-HTML -TitleText 'My title' -UseCssLinks:$true -UseJavaScriptLinks:$true -FilePath $PSScriptRoot\Example-Tabs03.html -Show {
    New-HTMLTabOptions -SlimTabs -Transition -LinearGradient -SelectorColor Gold -SelectorColorTarget AliceBlue
    New-HTMLTab -Name 'First Level Tab - Test 1' -IconBrands acquisitions-incorporated {
        New-HTMLTab -Name '2nd Level Tab - Test 1/1' -IconRegular address-card {
            New-HTMLTab -Name '3rd level' {
                New-HTMLTab -Name '4th' {
                    New-HTMLTable -ArrayOfObjects $Test1 -HideFooter
                }
            }
        }
        New-HTMLTab -Name '2nd Level Tab - Test 1/2' -IconRegular address-card {
            New-HTMLTable -ArrayOfObjects $Test1 -HideFooter
        }
        New-HTMLTab -Name '2nd Level Tab - Test 1/3' -IconRegular address-card {
            New-HTMLTable -ArrayOfObjects $Test1 -HideFooter
        }
        New-HTMLTab -Name '2nd Level Tab - Test 1/4' -IconRegular address-card {
            New-HTMLTable -ArrayOfObjects $Test1 -HideFooter
        }
    }

    New-HTMLTab -Name 'First Level Tab - Test 4' -IconSolid bezier-curve {
        New-HTMLTab -Name '2nd Level Tab - Test 4/1' -IconBrands app-store {
            New-HTMLTable -ArrayOfObjects $Test1 -HideFooter {
                New-HTMLTableHeader -Names 'ID', 'HandleCount' -ResponsiveOperations none
            }
        }
        New-HTMLTab -Name '2nd Level Tab - Test 4/2' {
            New-HTMLTable -ArrayOfObjects $Test1 -HideFooter {
                New-HTMLTableHeader -Names 'ID', 'HandleCount' -ResponsiveOperations none
            }
        }
    }
    New-HTMLTab -Name 'First Level Tab - Test 4' -IconSolid bezier-curve {
        New-HTMLSection -Invisible {
            New-HTMLTable -ArrayOfObjects $Test1 -HideFooter {
                New-HTMLTableHeader -Names 'ID', 'HandleCount' -ResponsiveOperations none
            }

            New-HTMLTable -ArrayOfObjects $Test1 -HideFooter {
                New-HTMLTableHeader -Names 'ID', 'HandleCount' -ResponsiveOperations none
            }
        }
    }
}
The only caveat here is that you need to make sure to always define New-HTMLTab next to each other. You shouldn't try and add Tabs within sections as it breaks tabs.
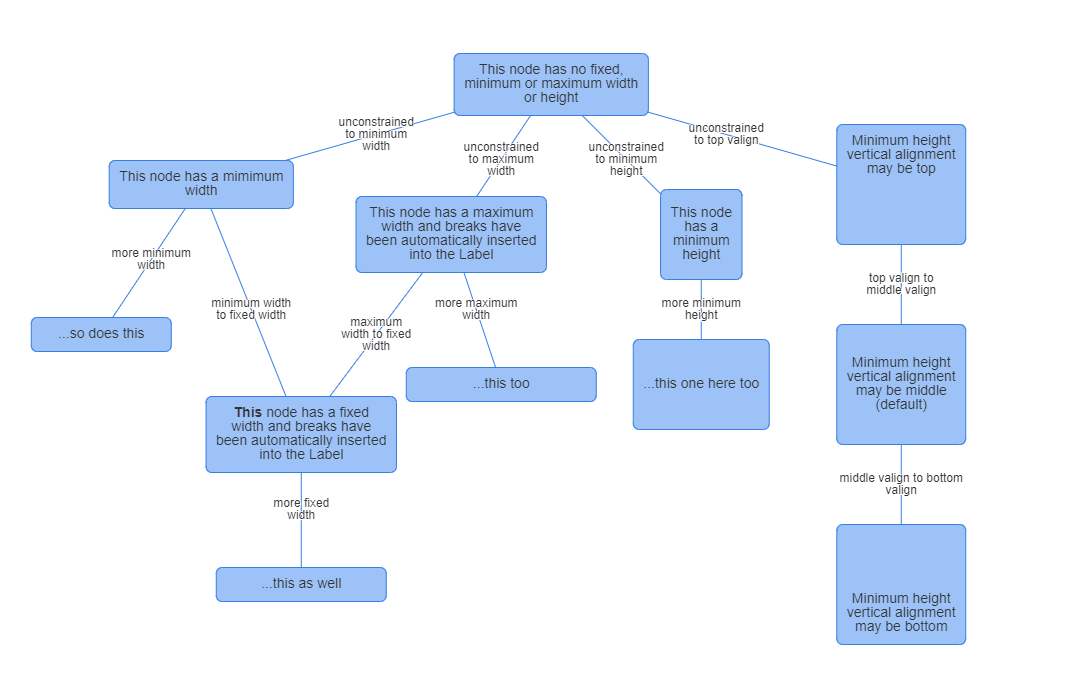
💡 PSWriteHTML – Diagram Example
I thought it would be a good idea to create a Diagram that a bit different than your normal one. Its a copy of the diagram shown on Vis.js examples page. As you can notice, nodes were given fixed positions using X and Y parameters. They also show WidthConstraint and HeightConstraint usage along with essential support for HTML tags (bold/italic mostly).
Import-Module .\PSWriteHTML.psd1 -Force

New-HTML -UseCssLinks -UseJavaScriptLinks -FilePath $PSScriptRoot\Example-LotsOfTexts.html {
    New-HTMLDiagram -Height "1500px" {
        New-DiagramOptionsLinks -FontSize 12 -WidthConstraint 90
        New-DiagramOptionsNodes -WidthConstraintMaximum 200 -Margin 10 -Shape box
        New-DiagramOptionsPhysics -Enabled $false

        New-DiagramNode -id 100 -Label "This node has no fixed, minimum or maximum width or height" -X -50 -Y -300
        New-DiagramNode -id 210 -WidthConstraintMinimum 120 -Label "This node has a mimimum width" -X -400 -Y -200
        New-DiagramNode -id 211 -WidthConstraintMinimum 120 -Label "...so does this" -X -500 -Y -50
        New-DiagramNode -id 220 -WidthConstraintMinimum 170 -Label "This node has a maximum width and breaks have been automatically inserted into the Label" -X -150 -Y -150
        New-DiagramNode -id 221 -WidthConstraintMinimum 170 -Label "...this too" -X -100 -Y 0
        New-DiagramNode -id 200 -FontMulti html -WidthConstraintMinimum 150 -Label: "**This** node has a fixed width and breaks have been automatically inserted into the Label" -X -300 -Y 50
        New-DiagramNode -id 201 -WidthConstraintMinimum 150 -Label "...this as well" -X -300 -Y 200
        New-DiagramNode -id 300 -HeightConstraintMinimum 70  -Label "This node`nhas a`nminimum`nheight" -X 100 -Y -150
        New-DiagramNode -id 301 -HeightConstraintMinimum 70  -Label "...this one here too" -X 100 -Y 0
        New-DiagramNode -id 400 -HeightConstraintMinimum 100 -HeightConstraintVAlign "top" -Label "Minimum height`nvertical alignment`nmay be top" -X 300 -Y -200
        New-DiagramNode -id 401 -HeightConstraintMinimum 100 -HeightConstraintVAlign "middle" -Label "Minimum height`nvertical alignment`nmay be middle`n(default)" -X 300 -Y 0
        New-DiagramNode -id 402 -HeightConstraintMinimum 100 -HeightConstraintVAlign "bottom" -Label "Minimum height`nvertical alignment`nmay be bottom" -X 300 -Y 200

        New-DiagramLink -from 100 -to 210 -Label "unconstrained to minimum width"
        New-DiagramLink -from 210 -to 211 -Label "more minimum width"
        New-DiagramLink -from 100 -to 220 -Label "unconstrained to maximum width"
        New-DiagramLink -from 220 -to 221 -Label "more maximum width"
        New-DiagramLink -from 210 -to 200 -Label "minimum width to fixed width"
        New-DiagramLink -from 220 -to 200 -Label "maximum width to fixed width"
        New-DiagramLink -from 200 -to 201 -Label "more fixed width"
        New-DiagramLink -from 100 -to 300 -Label "unconstrained to minimum height"
        New-DiagramLink -from 300 -to 301 -Label "more minimum height"
        New-DiagramLink -from 100 -to 400 -Label "unconstrained to top valign"
        New-DiagramLink -from 400 -to 401 -Label "top valign to middle valign"
        New-DiagramLink -from 401 -to 402 -widthConstraint 150 -Label "middle valign to bottom valign"
    }
} -ShowHTML
I am still not happy with the way you manage text, so you may expect some improvements in that area.
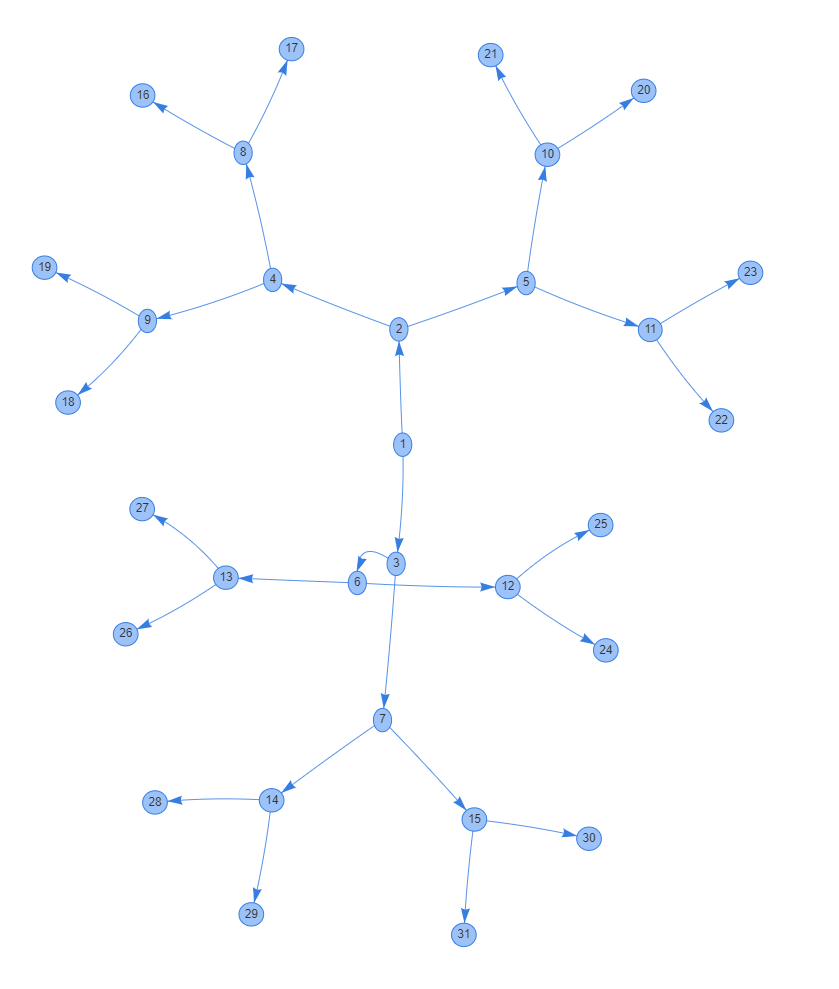
💡 PSWriteHTML – Diagram Example
Here's another example that builds a simple diagram with lots of connections. Nothing fancy, but cool looking.
Import-Module .\PSWriteHTML.psd1 -Force

$Nodes = 1..31

$Links = @(
    @{ from = 1; to = 2 }
    @{ from = 1; to = 3 }
    @{ from = 2; to = 4 }
    @{ from = 2; to = 5 }
    @{ from = 3; to = 6 }
    @{ from = 3; to = 7 }
    @{ from = 4; to = 8 }
    @{ from = 4; to = 9 }
    @{ from = 5; to = 10 }
    @{ from = 5; to = 11 }
    @{ from = 6; to = 12 }
    @{ from = 6; to = 13 }
    @{ from = 7; to = 14 }
    @{ from = 7; to = 15 }
    @{ from = 8; to = 16 }
    @{ from = 8; to = 17 }
    @{ from = 9; to = 18 }
    @{ from = 9; to = 19 }
    @{ from = 10; to = 20 }
    @{ from = 10; to = 21 }
    @{ from = 11; to = 22 }
    @{ from = 11; to = 23 }
    @{ from = 12; to = 24 }
    @{ from = 12; to = 25 }
    @{ from = 13; to = 26 }
    @{ from = 13; to = 27 }
    @{ from = 14; to = 28 }
    @{ from = 14; to = 29 }
    @{ from = 15; to = 30 }
    @{ from = 15; to = 31 }
)


New-HTML -TitleText 'My diagram' -FilePath $PSScriptRoot\Example-RandomDiagram.html {
    New-HTMLDiagram -Height '1000px' {
        New-DiagramOptionsLinks -ArrowsToEnabled $true -ArrowsToType arrow
        foreach ($_ in $Nodes) {
            New-DiagramNode -Label $_ -Level $_
        }
        foreach ($_ in $Links) {
            New-DiagramLink -From $_.From -To $_.To
        }

    }
} -ShowHTML -UseCssLinks -UseJavaScriptLinks
💡 PSWriteHTML – Calendar Usage
While I've mentioned Calendar before, I think it's a good idea to show you a** simple example** so you can use it for your own needs.
$ProcessSmaller = Get-Process | Select-Object -First 1

New-HTML -Name 'Test' -FilePath "$PSScriptRoot\Example28-Calendar01.html" -Show {
    New-HTMLSection {
        New-HTMLSection -HeaderText 'Test 1' {
            New-HTMLTable -DataTable $ProcessSmaller
        }
        New-HTMLSection -HeaderText 'Test 2' {
            New-HTMLCalendar {
                New-CalendarEvent -Title 'Active Directory Meeting' -Description 'We will talk about stuff' -StartDate (Get-Date)
                New-CalendarEvent -Title 'Lunch' -StartDate (Get-Date).AddDays(2).AddHours(-3) -EndDate  (Get-Date).AddDays(3) -Description 'Very long lunch'
            }
        }
    }
} -UseCssLinks -UseJavaScriptLinks
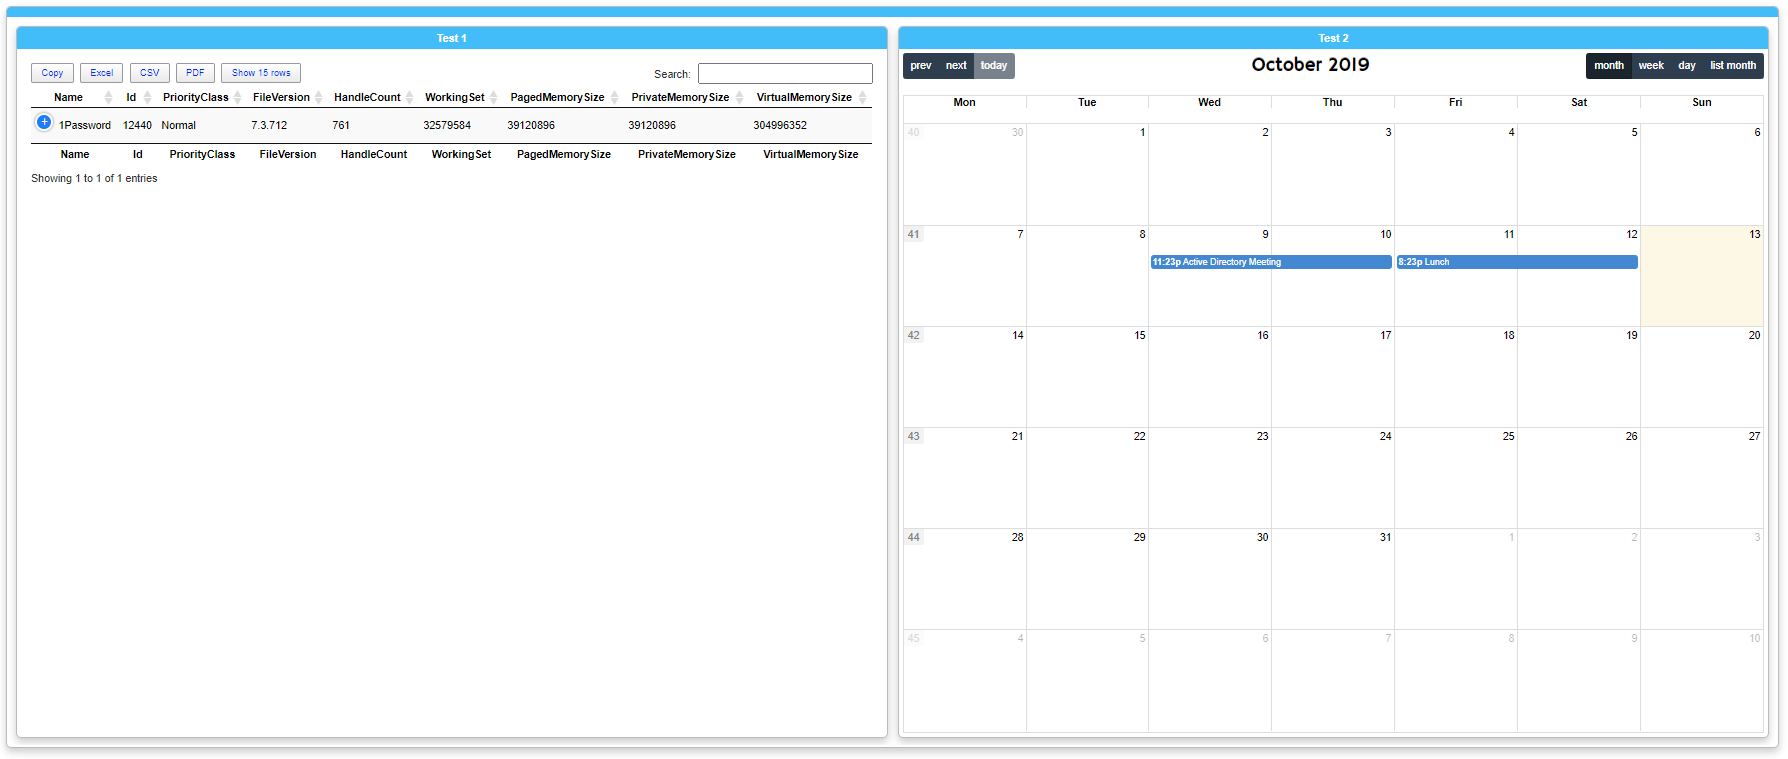
As you can see in the above example, adding a new calendar is as easy as using other PSWriteHTML features.
New-HTMLCalendar {
    New-CalendarEvent -Title 'Active Directory Meeting' -Description 'We will talk about stuff' -StartDate (Get-Date)
    New-CalendarEvent -Title 'Lunch' -StartDate (Get-Date).AddDays(2).AddHours(-3) -EndDate  (Get-Date).AddDays(3) -Description 'Very long lunch'
}
Just open up New-HTMLCalendar, and add events using New-CalendarEvent. Define a Title, StartDate, and optionally EndDate. You can also add a Description that will show up when you** hover over** an event.
💡 PSWriteHTML – Hierarchical Layout
Did you know you can create diagram with hierarchical layout? Well, now you know!
New-HTML -TitleText 'My Ubiquiti Network' -UseCssLinks:$true -UseJavaScriptLinks:$true -FilePath "$PSScriptRoot\Example-HierarchicalLayout03.html" {
    New-HTMLSection -HeaderText 'Diagram - My Network' -CanCollapse {
        New-HTMLPanel {
            New-HTMLDiagram -Height '1000px' {
                New-DiagramOptionsInteraction -Hover $true
                New-DiagramOptionsPhysics -Enabled $true
                New-DiagramOptionsLayout -RandomSeed 500 -HierarchicalEnabled $true
                New-DiagramNode -Label 'USG Pro' -To 'Unifi Switch'
                New-DiagramNode -Label 'Unifi Switch' -To 'Unifi AP', 'EvoWin'
                New-DiagramNode -Label 'Unifi AP' -To 'EvoMac', 'EvoWin' -Shape hexagon
                New-DiagramNode -Label 'EvoMac' -Shape ellipse
                New-DiagramNode -Label 'EvoWin' -To 'Exch1','Exch2','AD1','AD2','AD3','DC1','DC2' -Shape database
                New-DiagramNode -Label 'Exch1' -Shape diamond
                New-DiagramNode -Label 'Exch2' -Shape box
                New-DiagramNode -Label 'AD1'
                New-DiagramNode -Label 'AD2' -IconBrands apple -IconColor Bisque
                New-DiagramNode -Label 'AD3' -IconRegular address-card
                New-DiagramNode -Label 'DC1' -IconSolid address-book
                New-DiagramNode -Label 'DC2' -IconSolid address-card -IconColor Green -To '17000','17001'
                New-DiagramNode -ID '17000' -Label 'DC2'
                New-DiagramNode -ID '17001' -Label 'DC2'
            }
        }
    }
} -ShowHTML
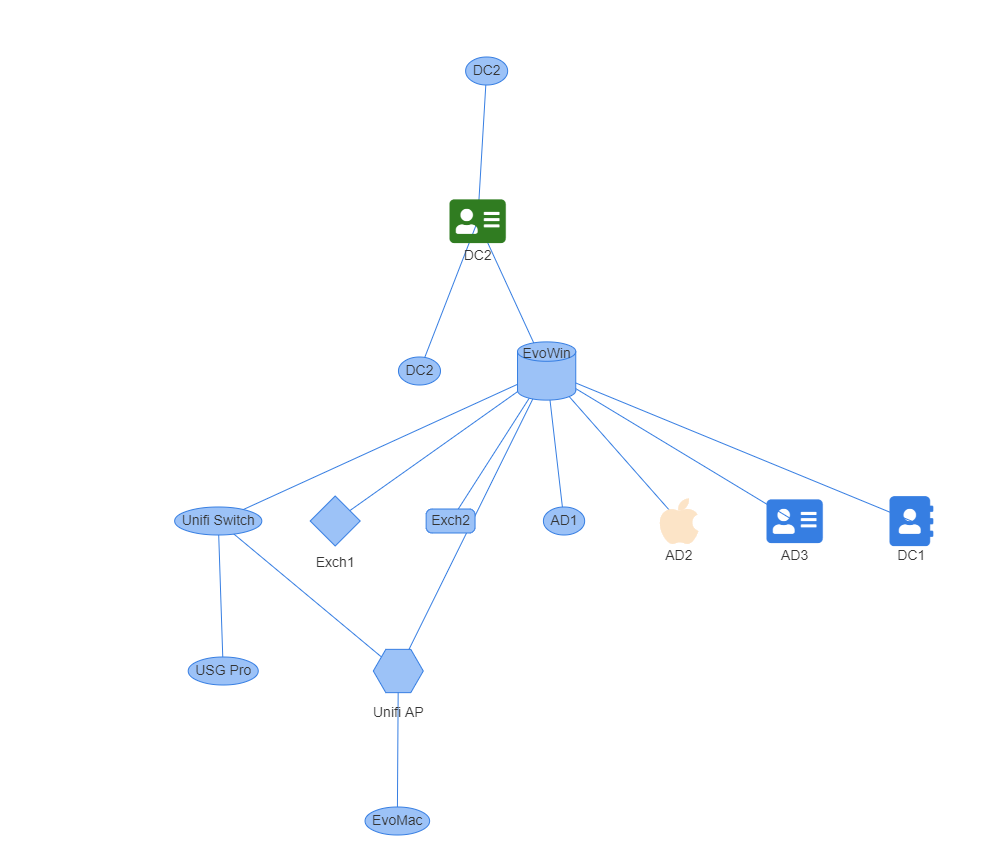
Change one line, and you can pick a different direction from left to right, down to up, and vice versa.
New-DiagramOptionsLayout -RandomSeed 500 -HierarchicalEnabled $true -HierarchicalDirection FromLeftToRight

The above example is a bit automatic, and you don't get to control how you want your nodes positioned. But you can do that – without using time-consuming X and Y parameters.
New-HTML -TitleText 'My Ubiquiti Network' -UseCssLinks:$true -UseJavaScriptLinks:$true -FilePath "$PSScriptRoot\Example-HierarchicalLayout04.html" {
    New-HTMLSection -HeaderText 'Diagram - My Network' -CanCollapse {
        New-HTMLDiagram -Height '1000px' {
            New-DiagramOptionsLayout -RandomSeed 500 -HierarchicalEnabled $true -HierarchicalDirection FromLeftToRight
            New-DiagramNode -Label 'DC2' -IconSolid address-card -IconColor Green -Level 1
            New-DiagramNode -ID '17000' -Label 'DC2' -Level 2 -To 'DC2'
            New-DiagramNode -ID '17001' -Label 'DC2' -Level 2 -To 'DC2'
            New-DiagramNode -Label 'DC3' -Level 3 -To '17001'
            New-DiagramNode -Label 'DC4' -Level 3 -To '17001'
            New-DiagramNode -Label 'Fourth Level' -Level 4 -To 'DC4'
        }
    }
} -ShowHTML
Notice how each diagram has a Level set.
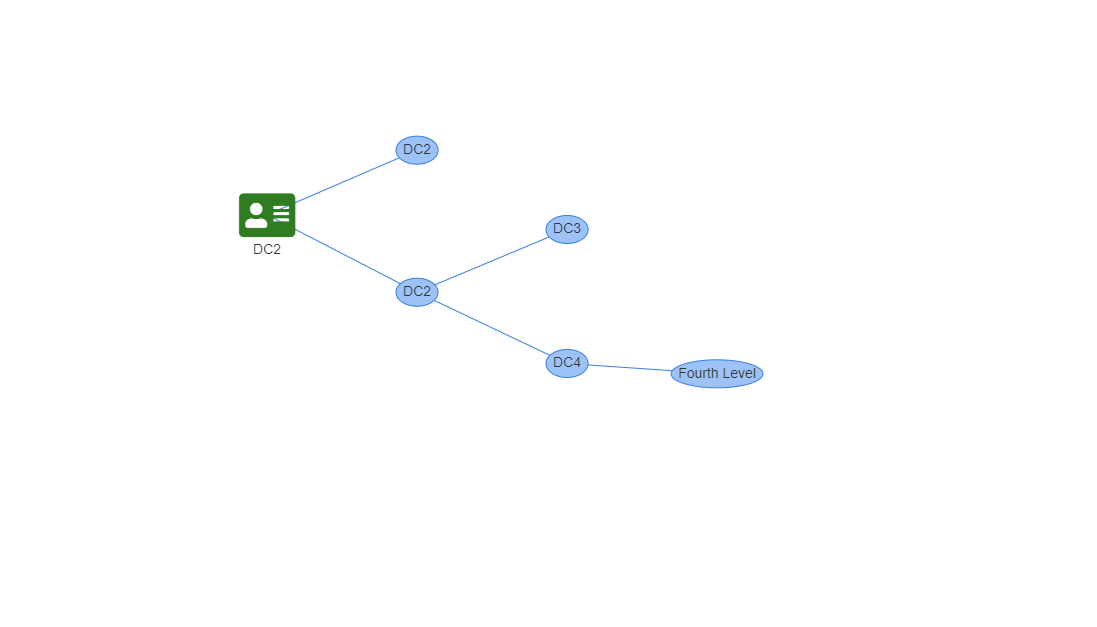
In earlier examples, positioning was done using X and Y parameters to make sure those are positioned as you want them? Well, with Level you don't have to – if you're after Hierarchical Layout.
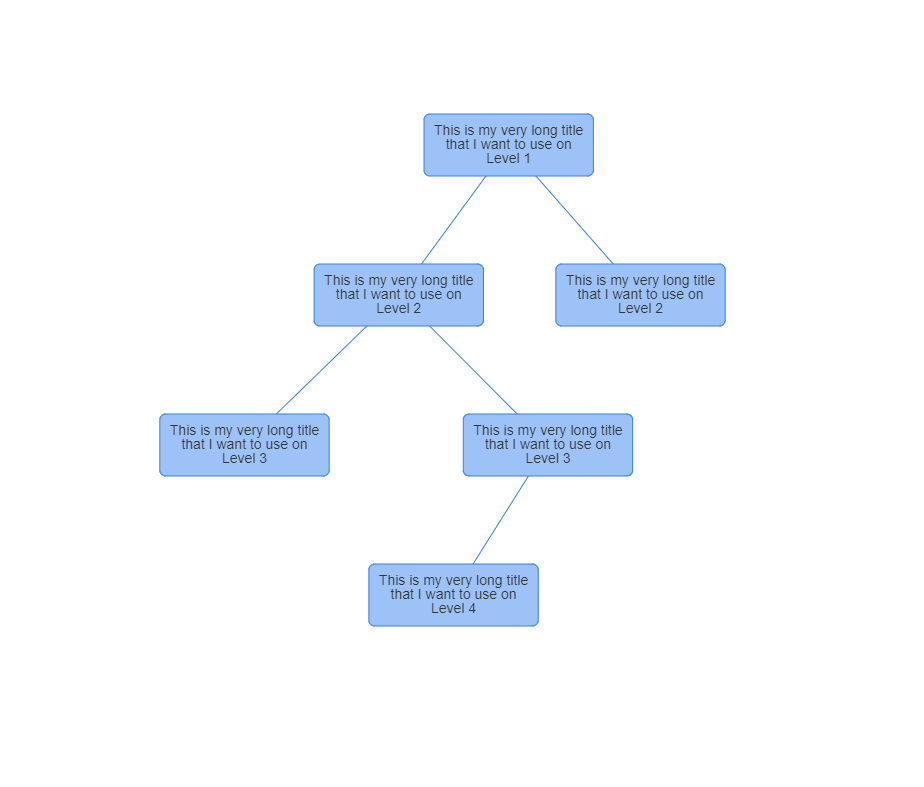
New-HTML -TitleText 'My Ubiquiti Network' -UseCssLinks -UseJavaScriptLinks -FilePath "$PSScriptRoot\Example-HierarchicalLayout05.html" {
    New-HTMLSection -HeaderText 'Diagram - My Network' -CanCollapse {
        New-HTMLDiagram -Height '1000px' {
            New-DiagramOptionsLayout -RandomSeed 500 -HierarchicalEnabled $true -HierarchicalDirection FromUpToDown
            New-DiagramOptionsLinks -FontSize 12 -WidthConstraint 90 -Length 200
            New-DiagramOptionsNodes -WidthConstraintMaximum 200 -Margin 10 -Shape box
            New-DiagramNode -ID 1 -Label "This is my very long title that I want to use on Level 1" -Level 1
            New-DiagramNode -ID 3 -Label "This is my very long title that I want to use on Level 2" -Level 2 -To 1
            New-DiagramNode -ID 4 -Label "This is my very long title that I want to use on Level 2" -Level 2 -To 1
            New-DiagramNode -ID 5 -Label "This is my very long title that I want to use on Level 3" -Level 3 -To 3
            New-DiagramNode -ID 6 -Label "This is my very long title that I want to use on Level 3" -Level 3 -To 3
            New-DiagramNode -ID 7 -Label "This is my very long title that I want to use on Level 4" -Level 4 -To 6
        }
    }
} -ShowHTML
New-HTML -TitleText 'My Ubiquiti Network' -UseCssLinks -UseJavaScriptLinks -FilePath "$PSScriptRoot\Example-HierarchicalLayout06.html" {
    New-HTMLSection -HeaderText 'Diagram - My Network' -CanCollapse {
        New-HTMLDiagram -Height '1000px' {
            New-DiagramOptionsLayout -RandomSeed 500 -HierarchicalEnabled $true -HierarchicalDirection FromUpToDown
            New-DiagramOptionsLinks -FontSize 12 -WidthConstraint 90 -Length 200
            New-DiagramOptionsNodes -WidthConstraintMaximum 200 -Margin 10 -Shape box
            New-DiagramNode -ID 1 -Label "Trump" -Level 1 -Image 'https://upload.wikimedia.org/wikipedia/commons/thumb/5/53/Donald_Trump_official_portrait_(cropped).jpg/220px-Donald_Trump_official_portrait_(cropped).jpg'
            New-DiagramNode -ID 3 -Label "This is my very long title that I want to use on Level 2" -Level 2 -To 1 -Image 'https://upload.wikimedia.org/wikipedia/commons/thumb/f/f7/Frank-Walter_Steinmeier_-_2018_(cropped).jpg/220px-Frank-Walter_Steinmeier_-_2018_(cropped).jpg'
            New-DiagramNode -ID 4 -Label "This is my very long title that I want to use on Level 2" -Level 2 -To 1 -Image 'https://www.jagranjosh.com/imported/images/E/Articles/Ram-Nath-Kovind-President-of-India.jpg'
            New-DiagramNode -ID 5 -Label "This is my very long title that I want to use on Level 3" -Level 3 -To 3 -Image 'https://upload.wikimedia.org/wikipedia/commons/thumb/f/f4/Emmanuel_Macron_in_2019.jpg/220px-Emmanuel_Macron_in_2019.jpg'
            New-DiagramNode -ID 6 -Label "This is my very long title that I want to use on Level 3" -Level 3 -To 3 -Image 'https://upload.wikimedia.org/wikipedia/commons/thumb/3/32/Xi_Jinping_2019.jpg/220px-Xi_Jinping_2019.jpg'
            New-DiagramNode -ID 7 -Label "Andrzej Duda" -Level 4 -To 6 -Image 'https://news.wttw.com/sites/default/files/styles/full/public/article/image-non-gallery/PolishPresident.jpg?itok=j4EoF9xD'
        }
    }
} -ShowHTML
You can, of course, take the same code as above and add images to it, to create an organization schema if needed.
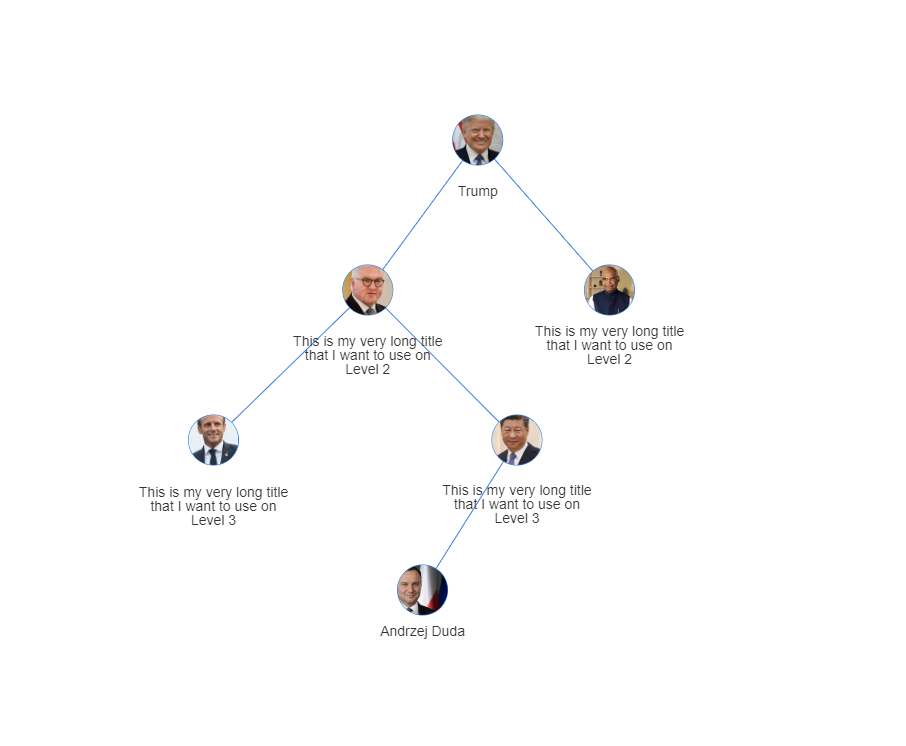
One of the ideas I had was to read the Active Directory manager field for each user and go from there building organization structure. If you ever create an automated one, please share it – I'm sure some people would love to have their diagram automated.
💡 Earlier resources for PSWriteHTML, Dashimo, Statusimo or Emailimo as PowerShell Modules
If you don't know PSWriteHTML, Dashimo, Emailimo or Out-HTMLView, please read those articles below to understand how you can use its power to fulfill your goals.
- Meet Statusimo – PowerShell generated Status Page
- Meet Dashimo – PowerShell Generated Dashboard
- Dashimo – Easy Table Conditional Formatting and more
- Out-HtmlView – HTML alternative to Out-GridView
- Meet Emailimo – New way to send pretty emails with PowerShell
- All your HTML Tables are belong to us
- Sending HTML emails with PowerShell and zero HTML knowledge required
- Dashimo (PSWriteHTML) – Charting, Icons and few other changes
- Working with HTML in PowerShell just got better
- Comparing two or more objects visually in PowerShell (cross-platform)
- Easy way to create diagrams using PowerShell and PSWriteHTML
To get it up and running, just install it from PowerShellGallery and you're good.
Install-Module PSWriteHTML -Force