blog
All your HTML Tables are belong to us
Last few days, I've fulfilled my little dream related to building HTML tables. You know I've been using HTML based scripts for a long while for Microsoft Exchange from multiple people like Steve Goodman or Paul Cunningham (and others) and when I was going thru their PowerShell building code on how they create an HTML table with multi-row titles I thought Those guys are crazy. The effort to build an HTML table for a report for a person who has no clue how to do it is not something one can easily digest and understand. Sure I've learned how to build HTML tables at some point, but there was one final piece that I was missing – multi-row headers. If you don't know what I mean, and how they look like the below image from Steve's Goodman script should give you a hint.
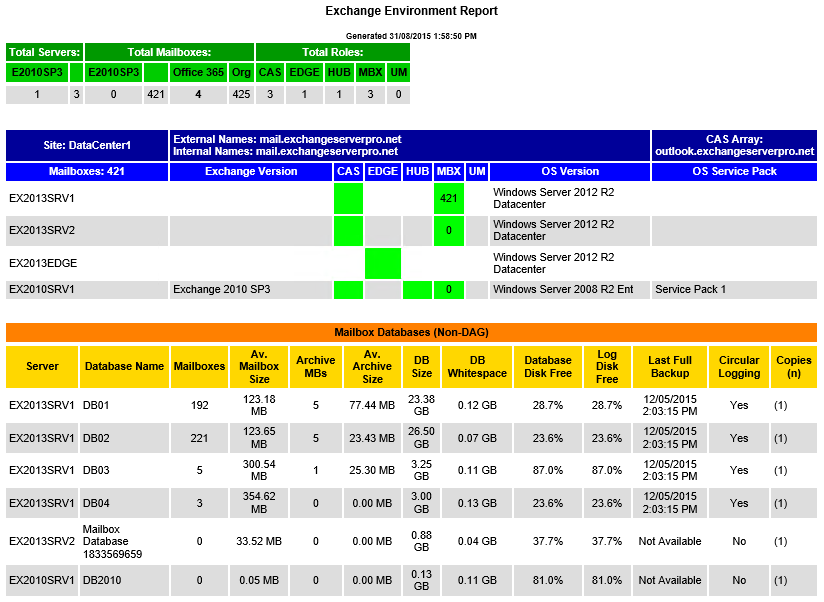
Looks nice right? Well, I always wanted to build something like that, but I am lazy, and I couldn't make myself to try and build this by hand. To give you an idea here's a copy/paste from Steve's Goodman script.
# 4 Write Information
_UpProg1 5 "Writing HTML Report Header" 4
# Header
$Output="


Exchange Environment Report
Generated $((Get-Date).ToString())


Total Servers:"
if ($ExchangeEnvironment.RemoteMailboxes)
    {
    $Output+="Total Mailboxes:"
    } else {
    $Output+="Total Mailboxes:"
    }
$Output+="Total Roles:
"
# Show Column Headings based on the Exchange versions we have
$ExchangeEnvironment.TotalMailboxesByVersion.GetEnumerator()|Sort Name| %{$Output+="$($ExVersionStrings[$_.Key].Short)"}
$ExchangeEnvironment.TotalMailboxesByVersion.GetEnumerator()|Sort Name| %{$Output+="$($ExVersionStrings[$_.Key].Short)"}
if ($ExchangeEnvironment.RemoteMailboxes)
{
    $Output+="Office 365"
}
$Output+="Org"
$ExchangeEnvironment.TotalServersByRole.GetEnumerator()|Sort Name| %{$Output+="$($ExRoleStrings[$_.Key].Short)"}
$Output+=""
$Output+=""
$ExchangeEnvironment.TotalMailboxesByVersion.GetEnumerator()|Sort Name| %{$Output+="$($_.Value.ServerCount)" }
$ExchangeEnvironment.TotalMailboxesByVersion.GetEnumerator()|Sort Name| %{$Output+="$($_.Value.MailboxCount)" }
if ($RemoteMailboxes)
{
    $Output+="$($ExchangeEnvironment.RemoteMailboxes)"
}
$Output+="$($ExchangeEnvironment.TotalMailboxes)"
$ExchangeEnvironment.TotalServersByRole.GetEnumerator()|Sort Name| %{$Output+="$($_.Value)"}
$Output+="
"
I always admired the effort to build that one, by hand with all data processing, including HTML building at one place. Something that I couldn't get myself to learn and use. But it's 2019 after all. Now I have PSWriteHTML module, and a few days ago I thought to myself, maybe I could make it work automatically for me? How hard can it be?!
💡 Merging Table Headers and Styling
Before I dive into the code, I wanted to give you a warning and something you will potentially have to manage on your own. First of all, this doesn't play exceptionally well with Responsive ability of tables in PSWriteHTML and Dashimo. If you have lots of columns, things started to look weird. It worked fine with 10 – 15 but then with 60 columns with identical data it would look differently. I've asked the creator of **DataTables, **and for now, there's no solution to this, but maybe sometime next year they will address this problem. So if you're into this situation, you may need to play around with some of the options that are available to you to mitigate this issue (if you get the problems I mentioned). In the code below, I'm using small data preparation, and then I'm showing both ways to create HTML in PSWriteHTML and Dashimo. Both give the same output, so it's up to you which one you prefer to use! The differences in syntax are minimal.
Import-Module PSWriteHTML -Force

# Preparing some data
$Properties = @(
    'Name'
    'Id'
    'PriorityClass'
    'FileVersion'
    'HandleCount'
    'WorkingSet'
    'PagedMemorySize'
    'PrivateMemorySize'
    'VirtualMemorySize'
    'TotalProcessorTime'
)
$ProcessesAll = Get-Process | Select-Object -First 30
$Processes = $ProcessesAll | Select-Object -First 30 -Property $Properties
# Preparing data End


# uses PSWriteHTML naming

New-HTML -TitleText 'Title' -UseCssLinks:$true -UseJavaScriptLinks:$true -FilePath $PSScriptRoot\Example01.html -ShowHTML {
    New-HTMLPanel {
        New-HTMLTable -DataTable $Processes -HideFooter -ScrollCollapse {
            New-HTMLTableHeader -Names 'Name', 'ID' -Title 'Process Information' -Color Red -FontWeight lighter -Alignment left -BackGroundColor LightBlue
            New-HTMLTableHeader -Names 'PagedMemorySize', 'PrivateMemorySize', 'VirtualMemorySize' -Title 'Memory' -Color White -BackGroundColor Blue
            New-HTMLTableHeader -Names 'Name' -BackGroundColor Red -Color WhiteSmoke
            New-HTMLTableHeader -Names 'Id' -BackGroundColor Blue -Color White
            New-HTMLTableHeader -Names 'PriorityClass', 'FileVersion', 'HandleCount' -BackGroundColor Gold -Color White
            New-HTMLTableHeader -BackGroundColor Green -Color White -Title 'Full Title'
            New-HTMLTableCondition -Name 'HandleCount' -ComparisonType number -Operator gt 500 -BackgroundColor Gray -Color White -Row
        }
    }
}

# Uses Dashimo naming

Dashboard -Name 'Title' -FilePath $PSScriptRoot\Example02.html -Show {
    Panel {
        Table -DataTable $Processes -HideFooter -ScrollCollapse {
            TableHeader -Names 'Name', 'ID' -Title 'Process Information' -Color Red -FontWeight lighter -Alignment left -BackGroundColor LightBlue
            TableHeader -Names 'PagedMemorySize', 'PrivateMemorySize', 'VirtualMemorySize' -Title 'Memory' -Color White -BackGroundColor Blue
            TableHeader -Names 'Name' -BackGroundColor Red -Color WhiteSmoke
            TableHeader -Names 'Id' -BackGroundColor Blue -Color White
            TableHeader -Names 'PriorityClass', 'FileVersion', 'HandleCount' -BackGroundColor Gold -Color White
            TableHeader -BackGroundColor Green -Color White -Title 'Full Title'
            TableConditionalFormatting -Name 'HandleCount' -ComparisonType number -Operator gt 500 -BackgroundColor Gray -Color White -Row
        }
    }
}

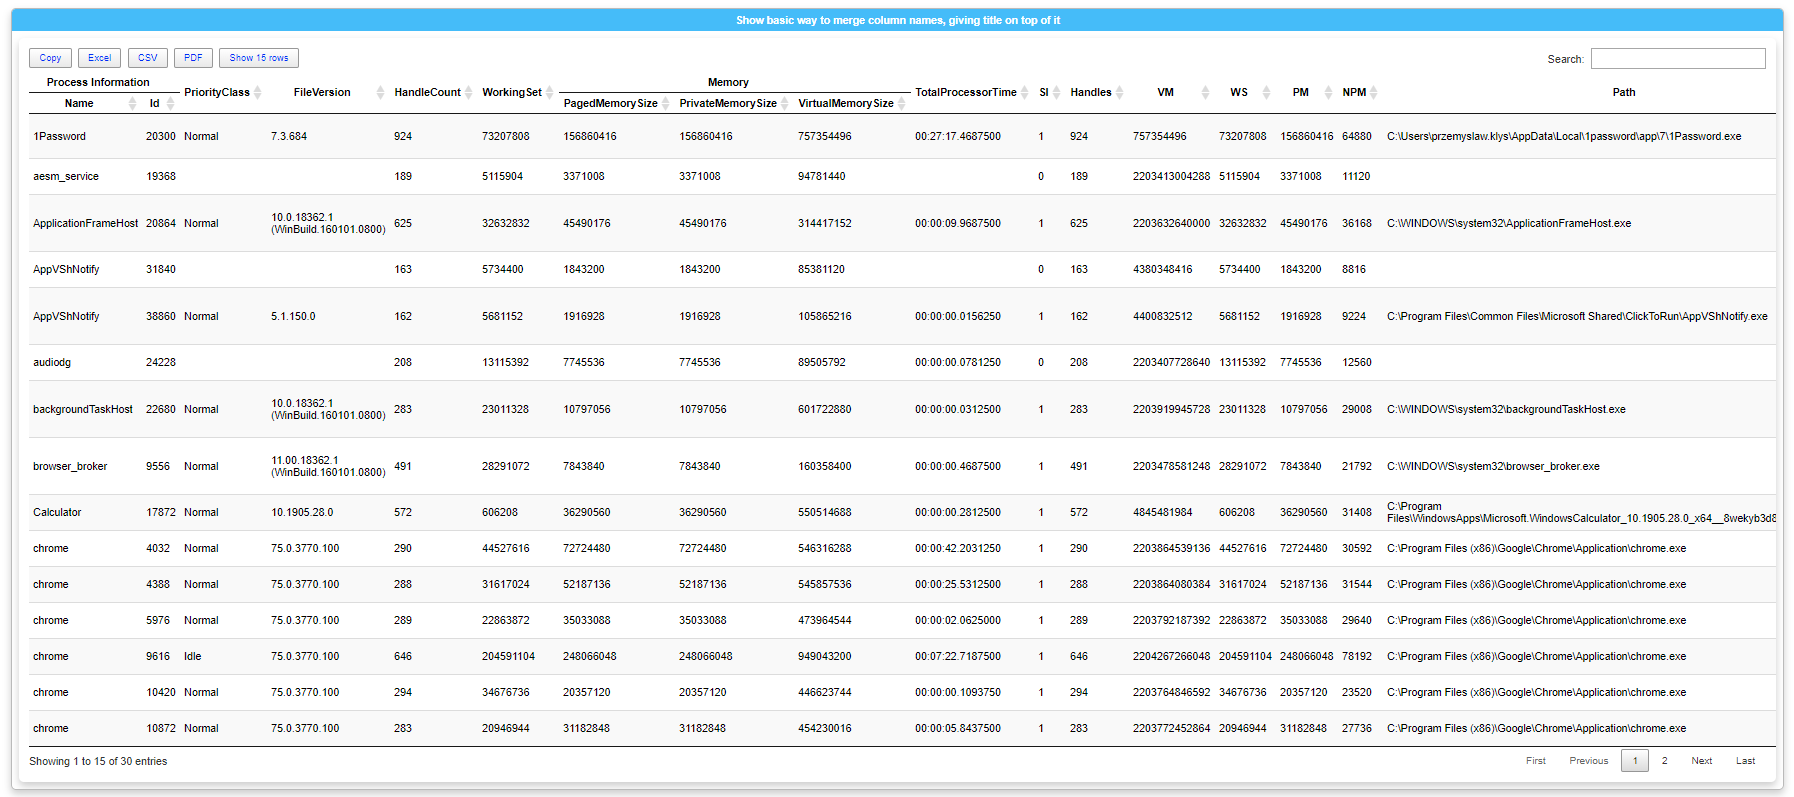
Looks cool right? Multi-row header, multiple colors to style things, and zero HTML code. Keep in mind I've not spent time on design of how colors match each other so while the above example looks ugly, you can style it as you want. This is a quick and dirty way to show you a new feature of command New-HTMLTableHeader. What's also important here is New-HTMLTableCondition command. The difference between those two is that New-HTMLTableHeader modifies HTML during the PowerShell Table building process. So it reads the header and manipulates all that is required to achieve results you see above. For New-HTMLTableCondition, it's a different story. It makes comparison during displaying of HTML with JavaScript. Why this matters? Well, it matters because table condition most likely has almost 0 impacts on the** table generation time** and it won't be visible if you disable JavaScript. On the other hand, the header does manipulation during generation so you may see some performance impact. Not something you will notice, but still worth to know.
💡 Styling and Merging Headers step by step
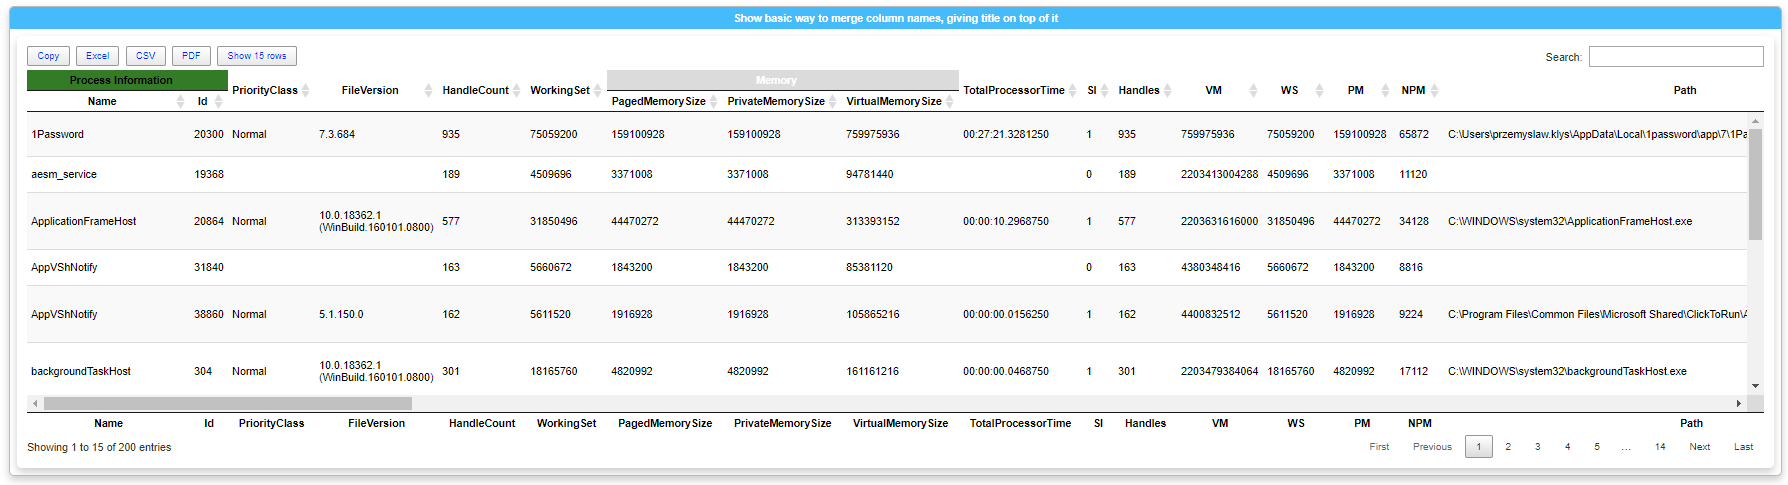
Now that you have seen all those features in action, let's go back to the beginning and make it visible what we're doing. Below is a simple table generated from Get-Process. You should notice I'm using DisableResponsiveTable switch because it has 60 columns and that makes it break excellent output, as I mentioned in the introduction. We then open bracket and use TableHeader command. In it's basic functionality, it has two parameters Names and Title. You tell Dashimo that you want to find Table Headings Name and ID and you want those two headings merged as Process Information. We do the same thing with three other headings telling it to find related memory columns and joined them together under Memory Title. Easy right?
$ProcessesAll = Get-Process | Select-Object -First 30

Dashboard -Name 'My title' -FilePath $PSScriptRoot\Example03.html -Show {
    Section -Name 'Show basic way to merge column names, giving title on top of it' {
        Panel {
            Table -DataTable $ProcessesAll -HideFooter -DisableResponsiveTable {
                TableHeader -Names 'Name', 'ID' -Title 'Process Information'
                TableHeader -Names 'PagedMemorySize', 'PrivateMemorySize', 'VirtualMemorySize' -Title 'Memory'
            }
        }
    }
}
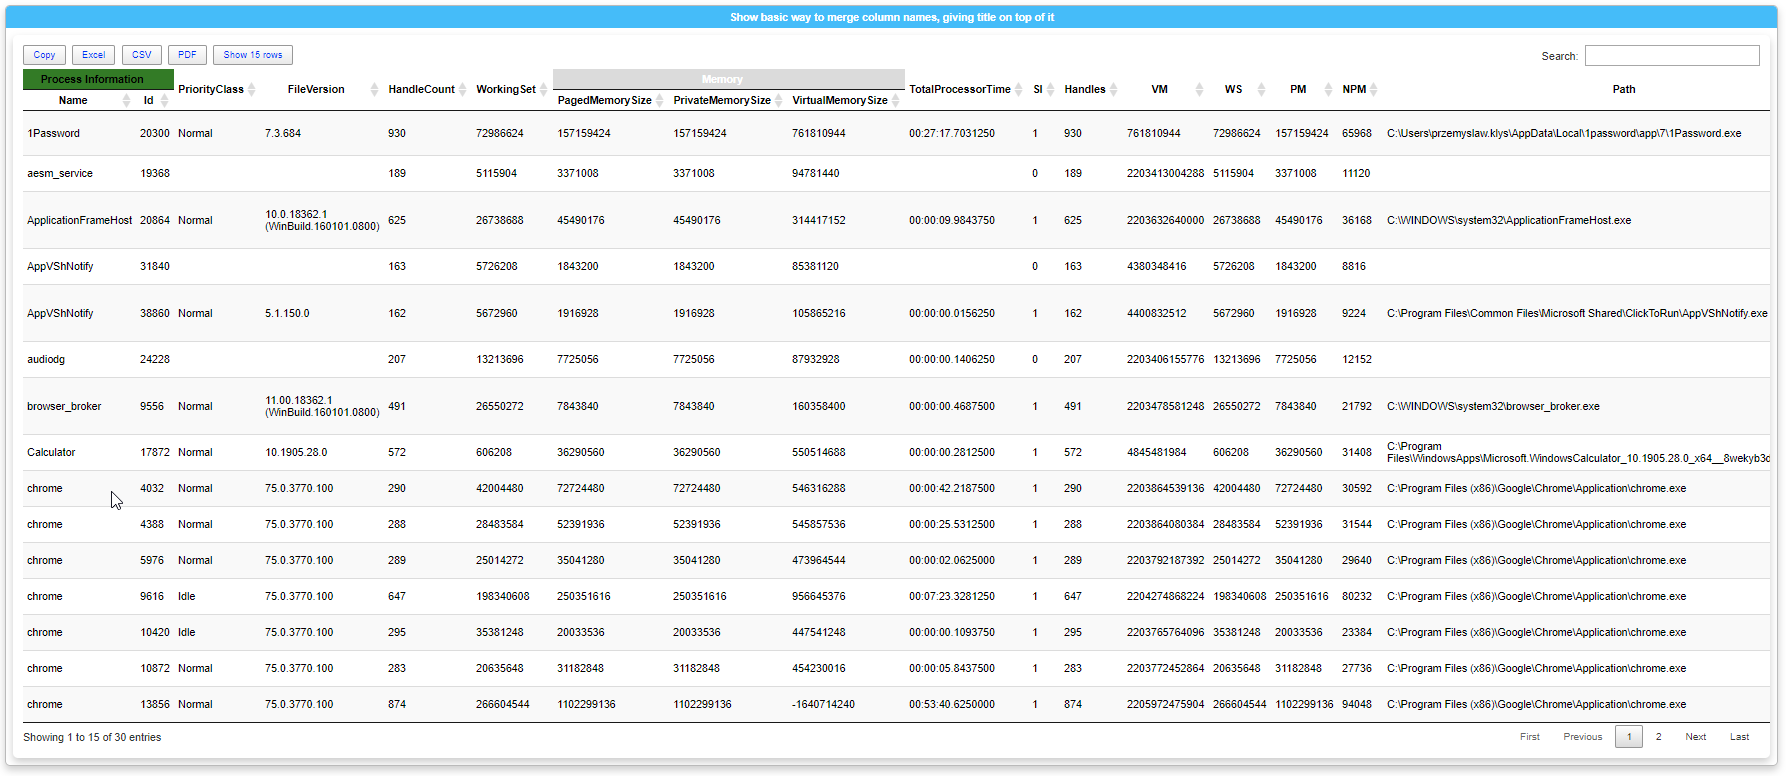
The code above is all you need to generate that HTML. It's not a trick. The TableHeader command has multiple other parameters. As you can see on the screenshot above there is Color, BackgroundColor, font size, Alignment and so on. So not only you can merge the header but you can also make the header with colors of your own.

As you can see above I've added Color and BackgroundColor parameters to both commands which are reflected on the screenshot below.
$ProcessesAll = Get-Process | Select-Object -First 30

Dashboard -Name 'My title' -FilePath $PSScriptRoot\Example03.html -Show {
    Section -Name 'Show basic way to merge column names, giving title on top of it' {
        Panel {
            Table -DataTable $ProcessesAll -HideFooter -DisableResponsiveTable {
                TableHeader -Names 'Name', 'ID' -Title 'Process Information' -BackGroundColor Green
                TableHeader -Names 'PagedMemorySize', 'PrivateMemorySize', 'VirtualMemorySize' -Title 'Memory' -Color White -BackGroundColor Gainsboro
            }
        }
    }
}
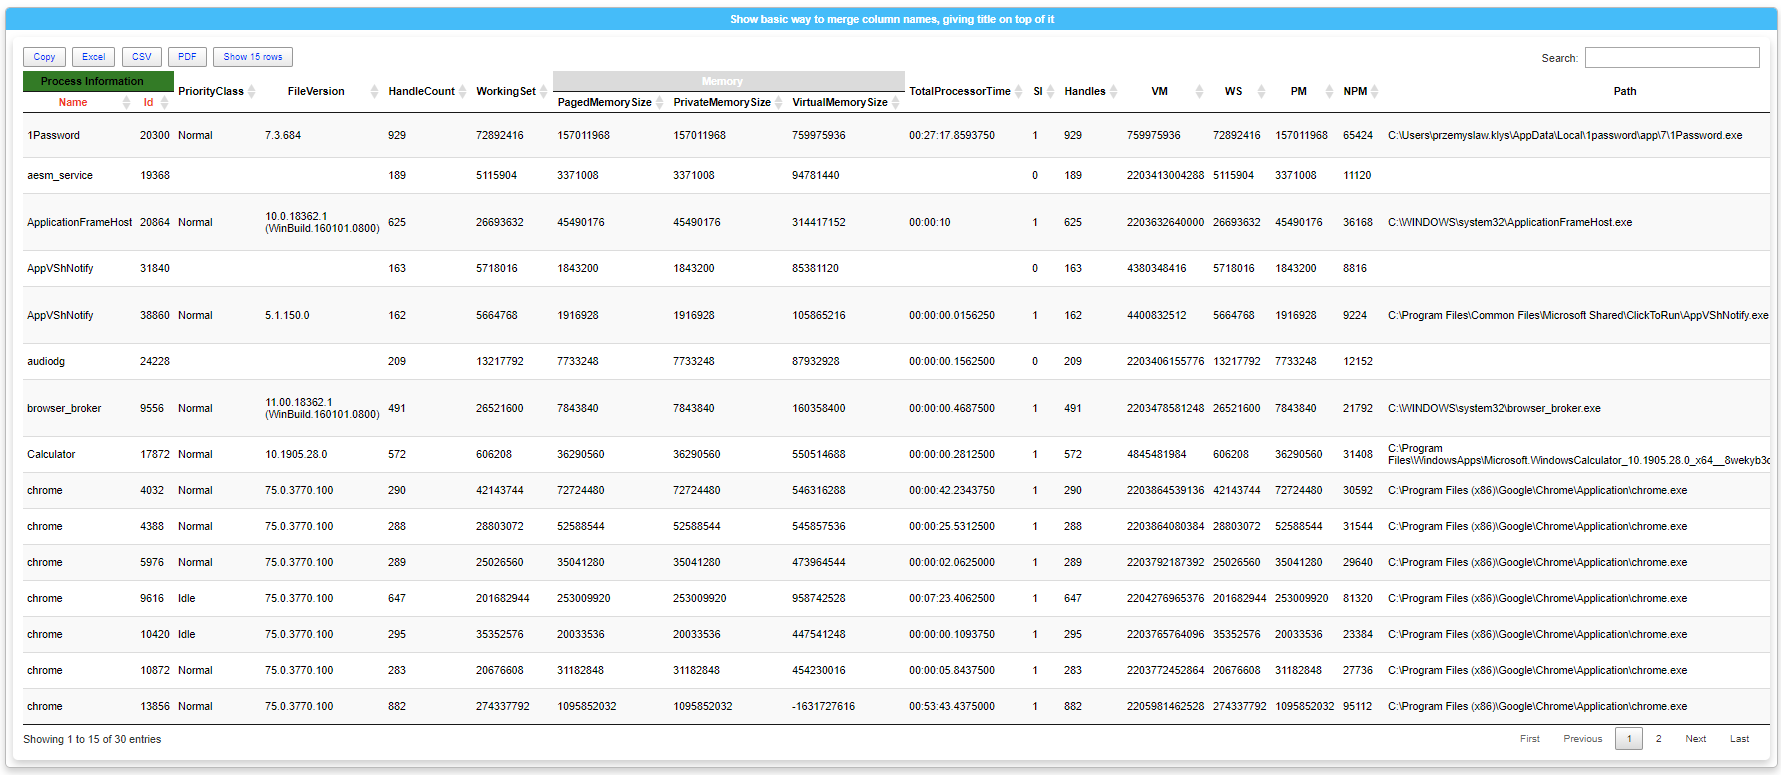
Now, if you would like to style Name and ID column names, you can do so as well. All you have to do is skip Title from the command. Dashimo/PSWriteHTML assumes that if you skip Title you don't want to do merging and styling of the Title, but you want to apply the style, apply to column headers instead.
TableHeader -Names 'Name', 'ID' -Color Red
After we add this little command to the code
$ProcessesAll = Get-Process | Select-Object -First 30

Dashboard -Name 'My title' -FilePath $PSScriptRoot\Example03.html -Show {
    Section -Name 'Show basic way to merge column names, giving title on top of it' {
        Panel {
            Table -DataTable $ProcessesAll -HideFooter -DisableResponsiveTable {
                TableHeader -Names 'Name', 'ID' -Title 'Process Information' -BackGroundColor Green
                TableHeader -Names 'PagedMemorySize', 'PrivateMemorySize', 'VirtualMemorySize' -Title 'Memory' -Color White -BackGroundColor Gainsboro
                TableHeader -Names 'Name', 'ID' -Color Red
            }
        }
    }
}
Cool right? You now style your column headers and merge columns together as you want!
💡 Adding more Titles
There is one more feature that I've added as part of this exercise. Sometimes you may want to do a Title without merging anything. Please noticed that I've limited output of properties for this example. I'm doing so because when you disable responsive table option HTML doesn't show full table (as seen on above screenshots) but in fact, all 67 columns are still in HTML. This affects the way I do an internal counting of columns. After all, for me, it's** still 67 columns** that I have to cover with this feature.
$Properties = @(
    'Name'
    'Id'
    'PriorityClass'
    'FileVersion'
    'HandleCount'
    'WorkingSet'
    'PagedMemorySize'
    'PrivateMemorySize'
    'VirtualMemorySize'
    'TotalProcessorTime'
    'SI'
    'Handles'
    'VM'
    'WS'
    'PM'
    'NPM',
    'PATH'
)

$ProcessesAll = Get-Process | Select-Object -First 30 -Property $Properties

Dashboard -Name 'My title' -FilePath $PSScriptRoot\Example03.html -Show {
    Section -Name 'Show basic way to merge column names, giving a title on top of it' {
        Panel {
            Table -DataTable $ProcessesAll -HideFooter -DisableResponsiveTable {
                TableHeader -Names 'Name', 'ID' -Title 'Process Information' -BackGroundColor Green
                TableHeader -Names 'PagedMemorySize', 'PrivateMemorySize', 'VirtualMemorySize' -Title 'Memory' -Color White -BackGroundColor Gainsboro
                TableHeader -Names 'Name', 'ID' -Color Red
                TableHeader -Title 'Process List - Example' -Color Black
            }
        }
    }
}
All that changed in Dashimo code was a single line.
TableHeader -Title 'Process List - Example' -Color Black
This time we have Title parameter, any styling (in my case just Color) and nothing else. Curious what it gets you?
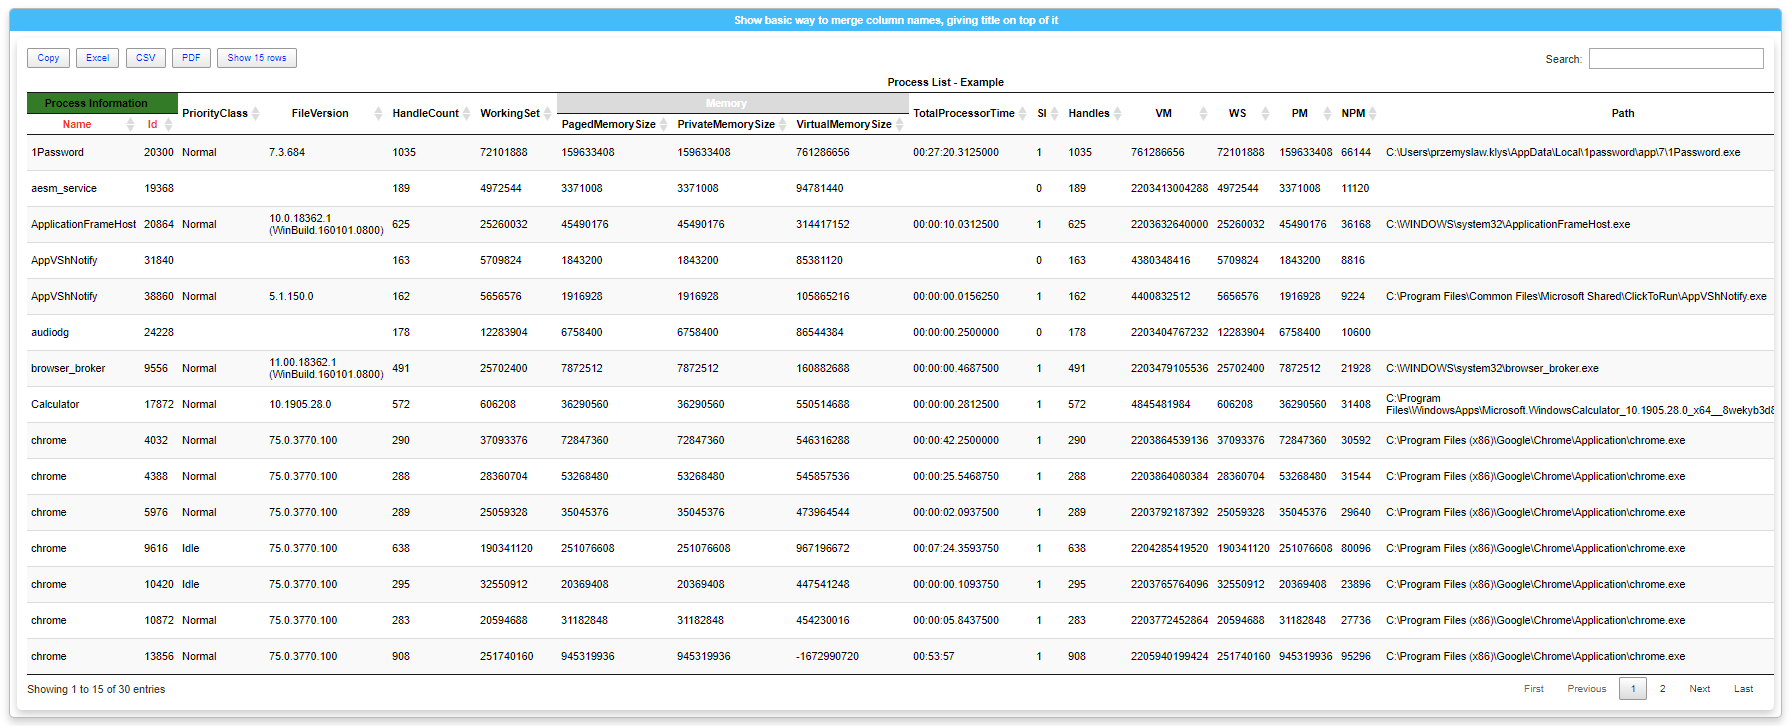
That's right. It added a style on top of it that fill in a whole range of columns. That's why we had to limit properties that are pushed to the table because it just wouldn't work – well it would, but the Title would be hidden from sight. That's not all though. You can actually have multiple titles added above. By adding following code
TableHeader -Title 'Process List - Part 0' -Color Black -ColumnCount 3 -BackGroundColor AliceBlue
TableHeader -Title 'Process List - Part 1' -Color Black -ColumnCount 2 -BackGroundColor Chocolate
TableHeader -Title 'Process List - Part 2' -Color White -BackGroundColor Gainsboro

You add one top row, that is split into three parts. First split is three columns long, the second split is two columns long and third one that doesn't have ColumnCount parameter takes the rest. Easy? I hope so!
💡 FixedHeader and FixedFooter – options for Table
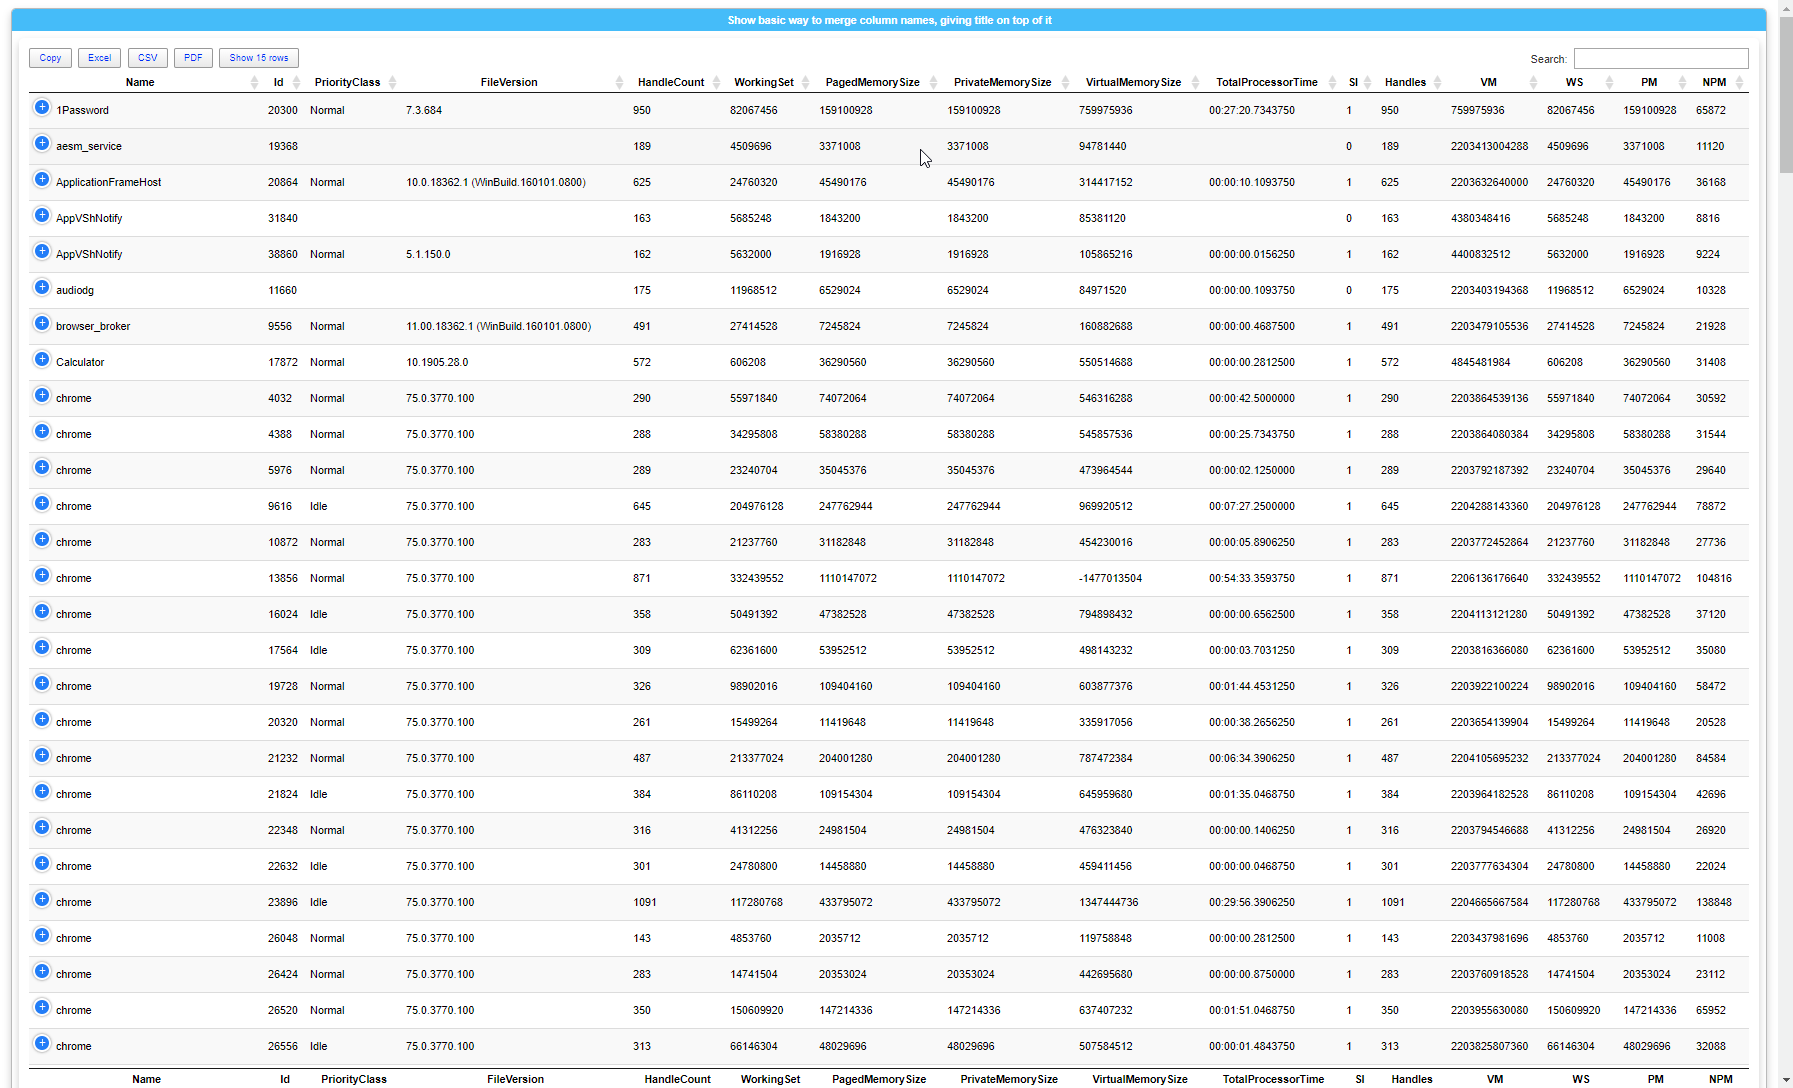
Sometimes you have a very long table with data. I've now added ability that is very useful when used with DisablePaging switch. FixedHeader or FixedFooter (or both for that matter) can be used on a table and give you the ability to use the sticky header/footer of the table. That way, when you** scroll very long table** you can easily see which column holds which data.
$ProcessesAll = Get-Process | Select-Object -First 200

Dashboard -Name 'My title' -FilePath $PSScriptRoot\Example04.html -Show {
    Section -Name 'Show basic way to merge column names, giving title on top of it' {
        Panel {
            Table -DataTable $ProcessesAll -FixedHeader -FixedFooter -DisablePaging
        }
    }
}
💡 ScrollX, ScrollY and Freezing columns – scrolling data the way you want to
When working on a couple of new features that I have described above, I've hit the problem of responsive tables. **Responsive tables are great, **but sometimes they limit you in a way you may not want to be limited. You may want to **Scroll your data **instead of using paging or expand button for each row. This feature adds scrolling — both vertically and horizontally. Best of all it plays well with a multi-row header.
$ProcessesAll = Get-Process | Select-Object -First 200

Dashboard -Name 'My title' -FilePath $PSScriptRoot\Example05.html -Show {
    Section -Name 'Show basic way to merge column names, giving title on top of it' {
        Panel {
            Table -DataTable $ProcessesAll -ScrollX -ScrollY -ScrollSizeY 300 {
                TableHeader -Names 'Name', 'ID' -Title 'Process Information' -BackGroundColor Green
                TableHeader -Names 'PagedMemorySize', 'PrivateMemorySize', 'VirtualMemorySize' -Title 'Memory' -Color White -BackGroundColor Gainsboro
            }
        }
    }
}
Problem with scrolling is that often when you scroll you usually want to compare first columns with other columns, but it's tough when those are already hidden. So now you can also fix this problem. Use FreezeColumnsRight and FreezeColumnsLeft parameters (or just one of those). You can tell that during scrolling first two or more columns will stay in place (always visible), while the rest of the columns will scroll. Useful? I hope so!
$ProcessesAll = Get-Process | Select-Object -First 200

Dashboard -Name 'My title' -FilePath $PSScriptRoot\Example05.html -Show {
    Section -Name 'Show basic way to merge column names, giving title on top of it' {
        Panel {
            Table -DataTable $ProcessesAll -ScrollX -ScrollY -ScrollSizeY 300 {
                TableHeader -Names 'Name', 'ID' -Title 'Process Information' -BackGroundColor Green
                TableHeader -Names 'PagedMemorySize', 'PrivateMemorySize', 'VirtualMemorySize' -Title 'Memory' -Color White -BackGroundColor Gainsboro
            } -FreezeColumnsRight 2 -FreezeColumnsLeft 2
        }
    }
}
💡 ResponivePriorityOrder, ResponsivePriorityOrderIndex – Responsive updates
I know I have spent most of this article describing how Responsive Tables have its problems but, that's not how I see them. To prove that I still believe Responsive Tables are the way to go I've added now ResponivePriorityOrder, ResponsivePriorityOrderIndex. The way it works, you tell Table which columns have priority to be always visible. You can do so by column names or column index.
$ProcessesAll = Get-Process | Select-Object -First 30

Dashboard -Name 'My title' -FilePath $PSScriptRoot\Example03.html -Show {
    Section -Name 'Show stuff' {
        Panel {
            Table -DataTable $ProcessesAll -HideFooter -ResponsivePriorityOrder Handles, VM, WS -ResponsivePriorityOrderIndex 5,7
        }
    }
}
Both can be used at the same time or just one of those. During resize, Responsivity will kick in and make sure that those columns that are supposed to be visible will stay visible. Keep in mind it's not magic; if it isn't able to fit all columns, it will start hiding them anyways.
💡 Installing Dashimo / PSWriteHTML
If you have never heard of Dashimo / PSWriteHTML before I encourage you to take a moment and read both articles below, it will make more sense, and if you liked what you have seen above you will get to love the tables, charts, conditions and other stuff it can do. It's effortless and intuitive.
Best way to install Dashimo / PSWriteHTML is using following commands. I publish Dashimo and PSWriteHTML as all my other modules in an optimized way. When you use source codes it's slower, having more junk and generally takes more effort to run.
Install-Module Dashimo -Force -AllowClobber
If you already have Dashimo/PSWriteHTML you can simply do
Update-Module Dashimo
All code is available on GitHub
I hope you enjoy this one, the same way I do. Have fun! Remember to leave review, star or just spread the love :-)